Divi Ultimate Documentation
Last modified 04.04.2021
1. Theme Requirements
✓ Self-Hosted WordPress Installation
✓ Divi Theme by Elegant Themes
✓ PHP version 7.2 or greater
✓ memory_limit 128M
✓ post_max_size 64M
✓ max_execution_time 180
✓ upload_max_filesize 64M
✓ max_input_time 180
✓ max_input_vars 5000
✓ MySQL version 5.6 or greater OR MariaDB version 10.0 or greater.
✓ HTTPS support
✓ Nginx or Apache with mod_rewrite module
✓ WooCommerce Plugin (optional)
✓ Instagram Feed Plugin (optional)
2. Introduction and Quick Video Installation
In the below video you can see how to:
- Upload and Activate the Divi Ultimate Child Theme
- Upload and Activate the needed plugins for all functions
- Upload and activate all Demo Layouts
- Import all Header & Footer Areas (ThemeBuilder)
- Import Theme Options
- Import Customizer Settings
- Set up the Demo Pages
- Create a Menu
- Assign Headers & Footers to specific pages
Direct Link to video file :
https://diviultimate.divi-themes.com/wp-content/uploads/DiviUltimateInstallation.mp4
Below you will find also all steps explained with images and documentation.
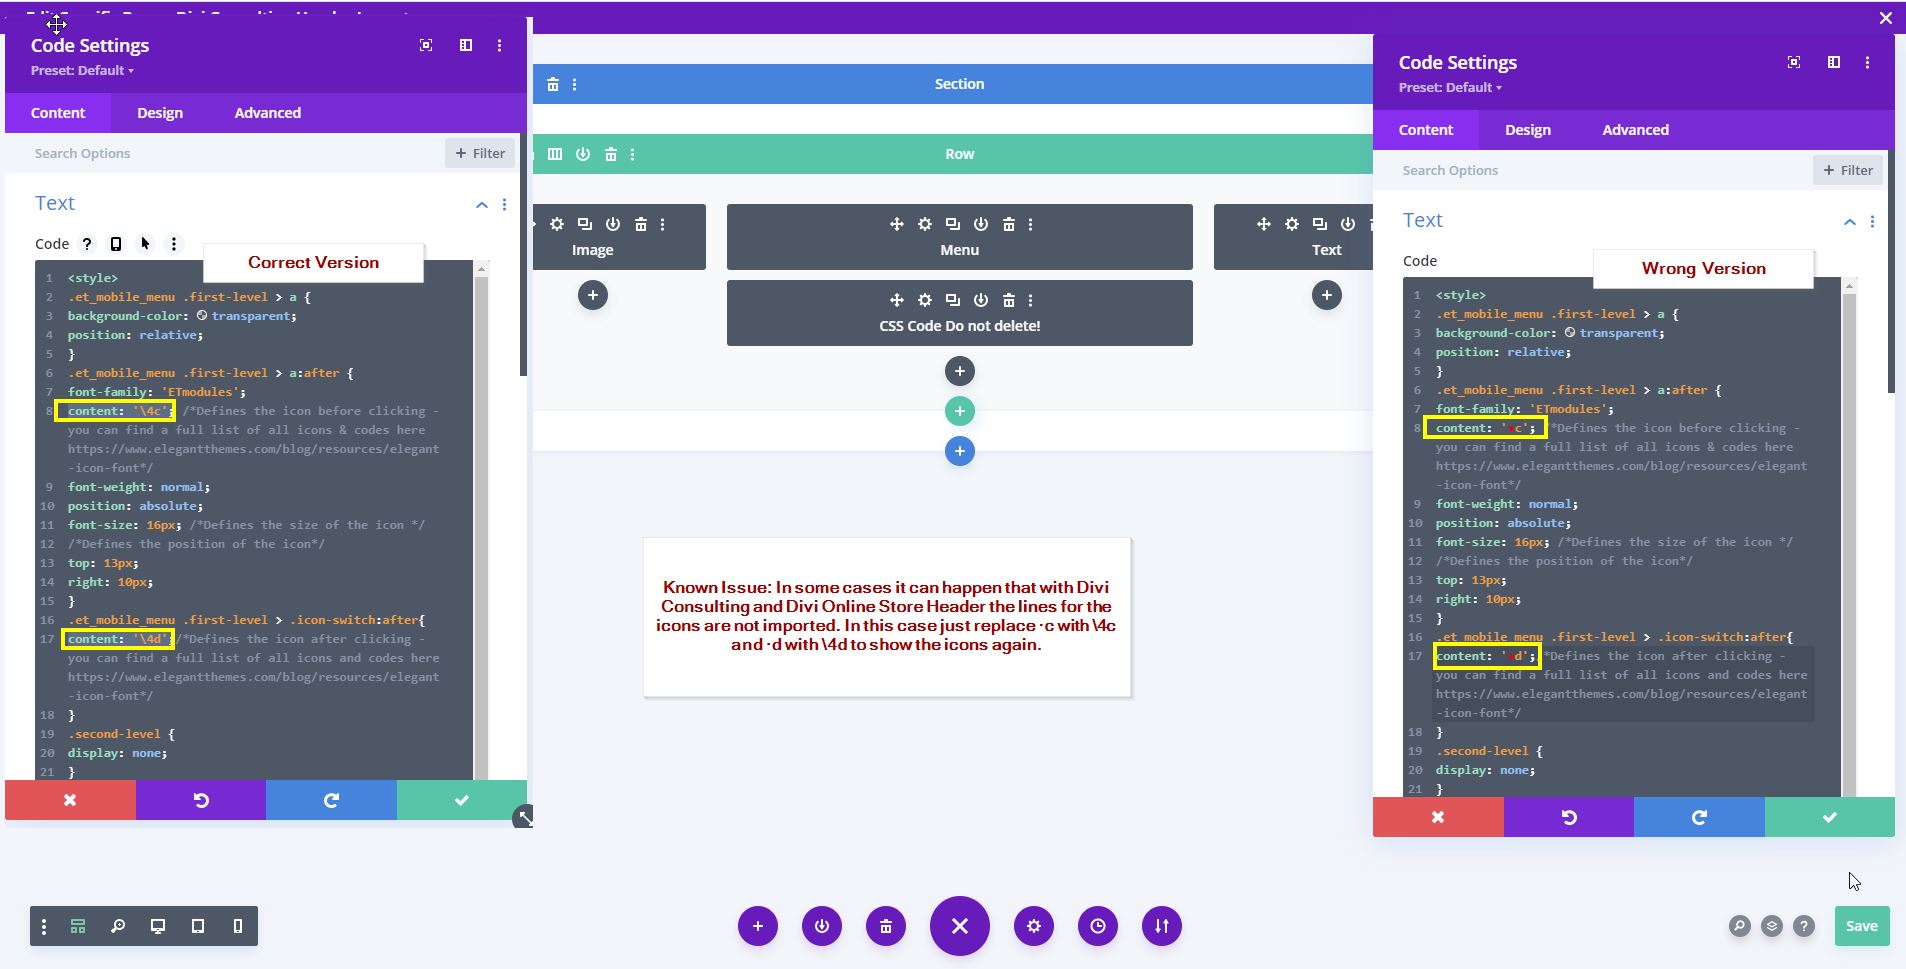
Known Issue: In some cases, it can happen that with Divi Consulting and Divi Online Store Header the lines for the icons are not imported. In this case, just replace ·c with \4c and ·d with \4d to show the icons again as shown in the below screenshot:
3. Installing Divi Ultimate Child Theme
Please upload the Divi Ultimate Child Theme to you your live and active WordPress website. Make sure the Divi parent theme is already installed, licensed and activated.
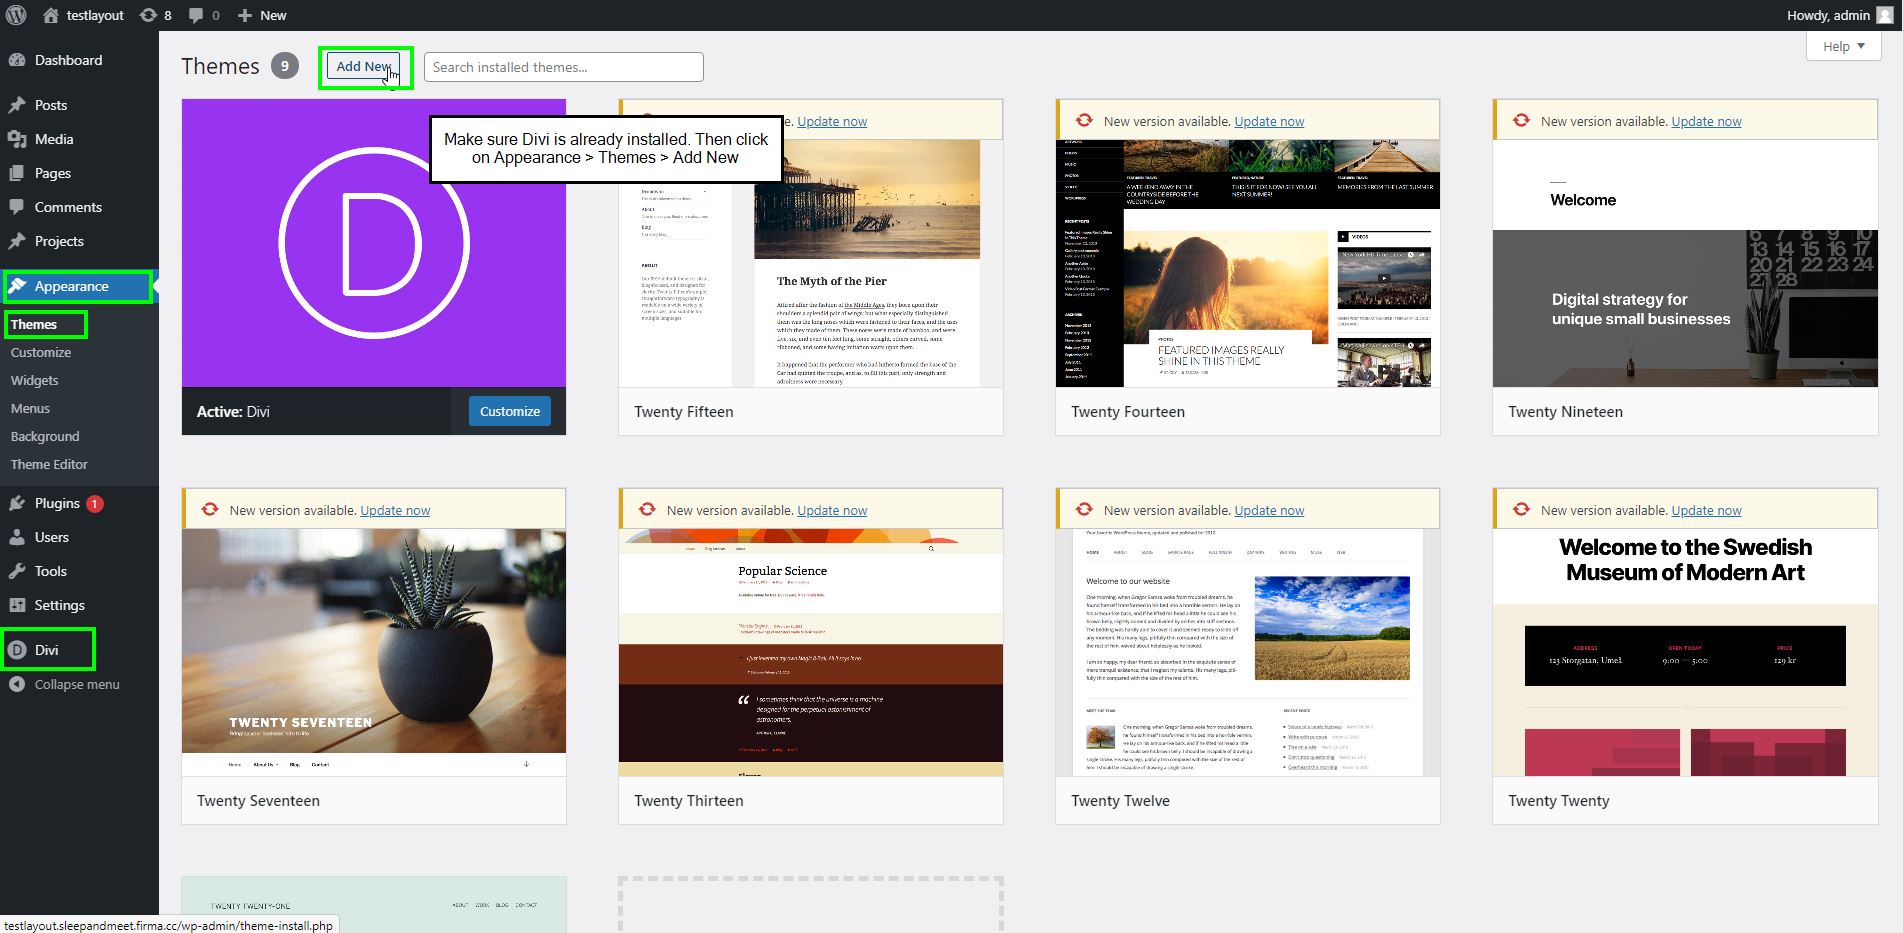
1. Click the ‘Appearance’ Menu Item on the left-hand sidebar.
2. When the Themes Page opens, click the ‘Add New’ button.
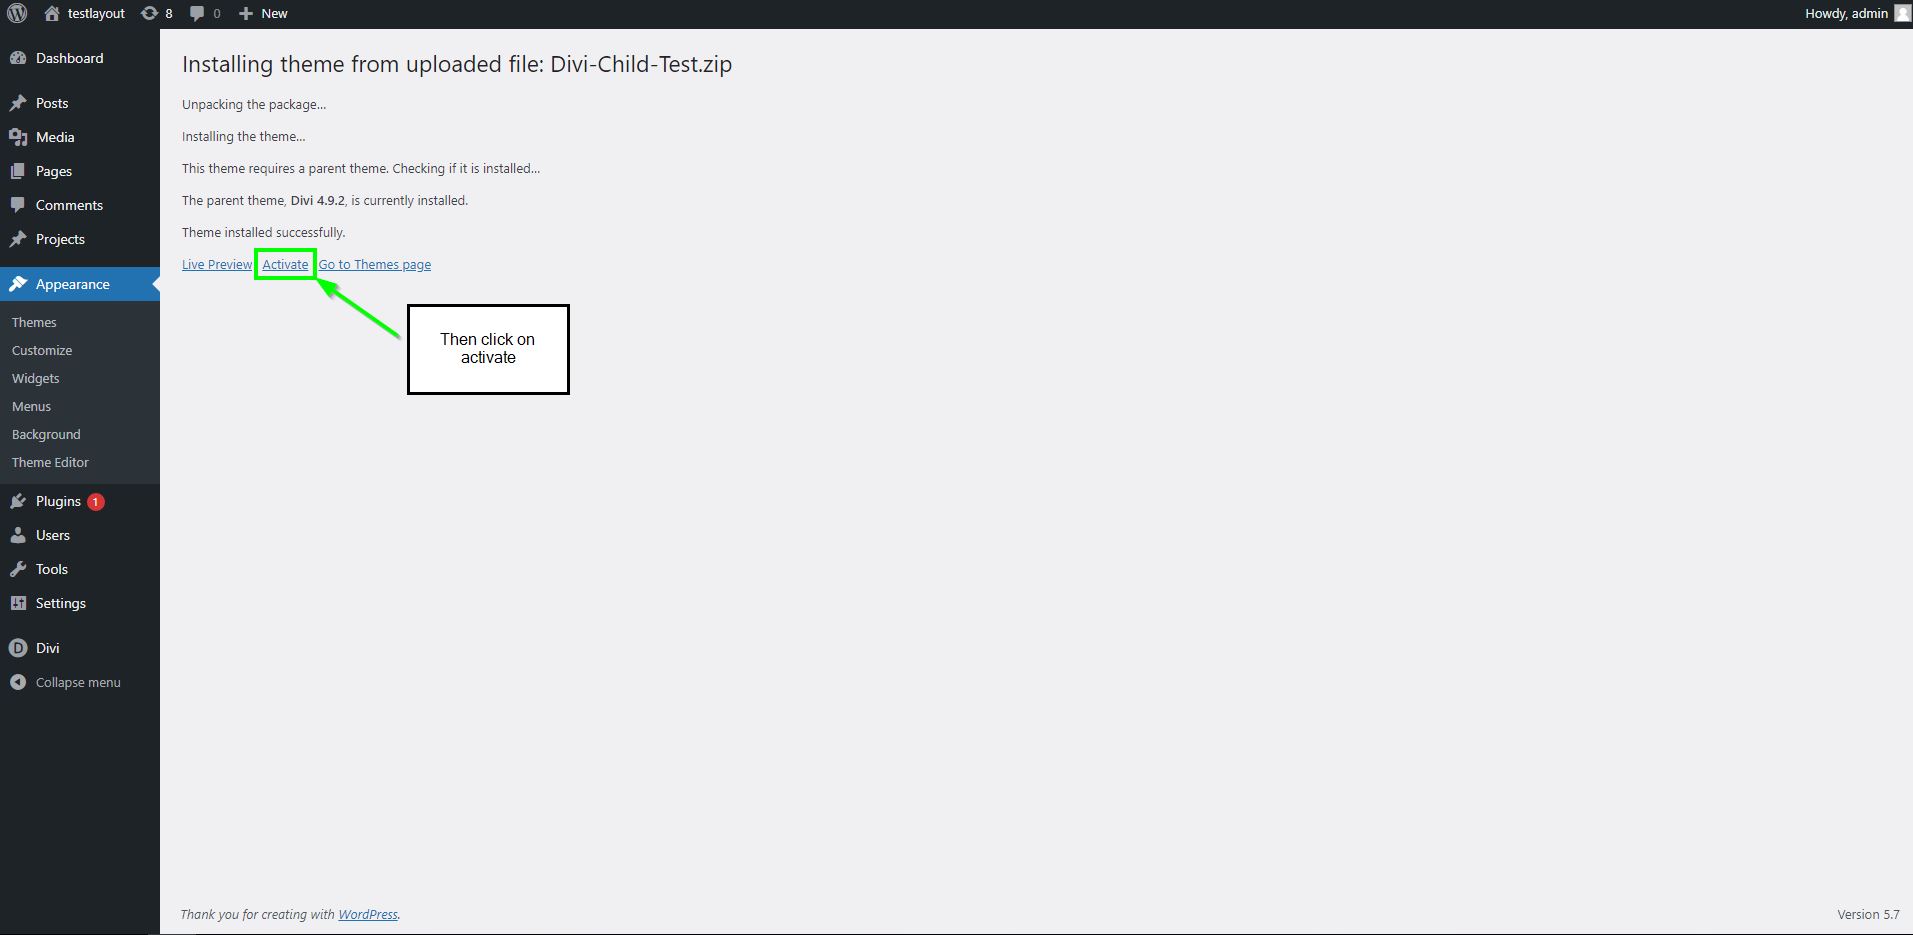
6. The page will re-load, and after the theme has been fully uploaded, you will be presented with an “Activate Theme” link. Click this to activate the child theme and complete the installation.
7. Now you can see that the Divi Child Theme has been uploaded and activated. It must be activated and beside it there should be the parent theme “Divi”
4. Installing recommended plugins
Once the child theme is active on your site, you need to install the 4 additional free plugins from the WordPress library to run all features:
- SEO Yoast by Team Yoast – for the Breadcrumb Function
- WP and Divi Icons from Aspen Grove Studios – for the new Divi Icons
- WooCommerce – for the Divi Online Store
- Date and Time Picker by Input WP – for the Date Picker integration in the Contact Form for Deluxe Hotel
1. Click on Plugins > Add New and enter the keywords “breadcrumb”, “wp divi icons”, “WooCommerce” and “Date and Time Picker” in the search bar in the top right. Then install the plugins and click on active. Once you have activated them you will see the plugins in the Plugin area of your WordPress dashboard.
4a. Installing recommended plugins | How to setup Breadcrumbs with SEO Yoast
HINT: The breadcrumb hook is placed in your functions.php file which comes with this Divi Child Theme. You don´t have to change anything there. This is just for your information.
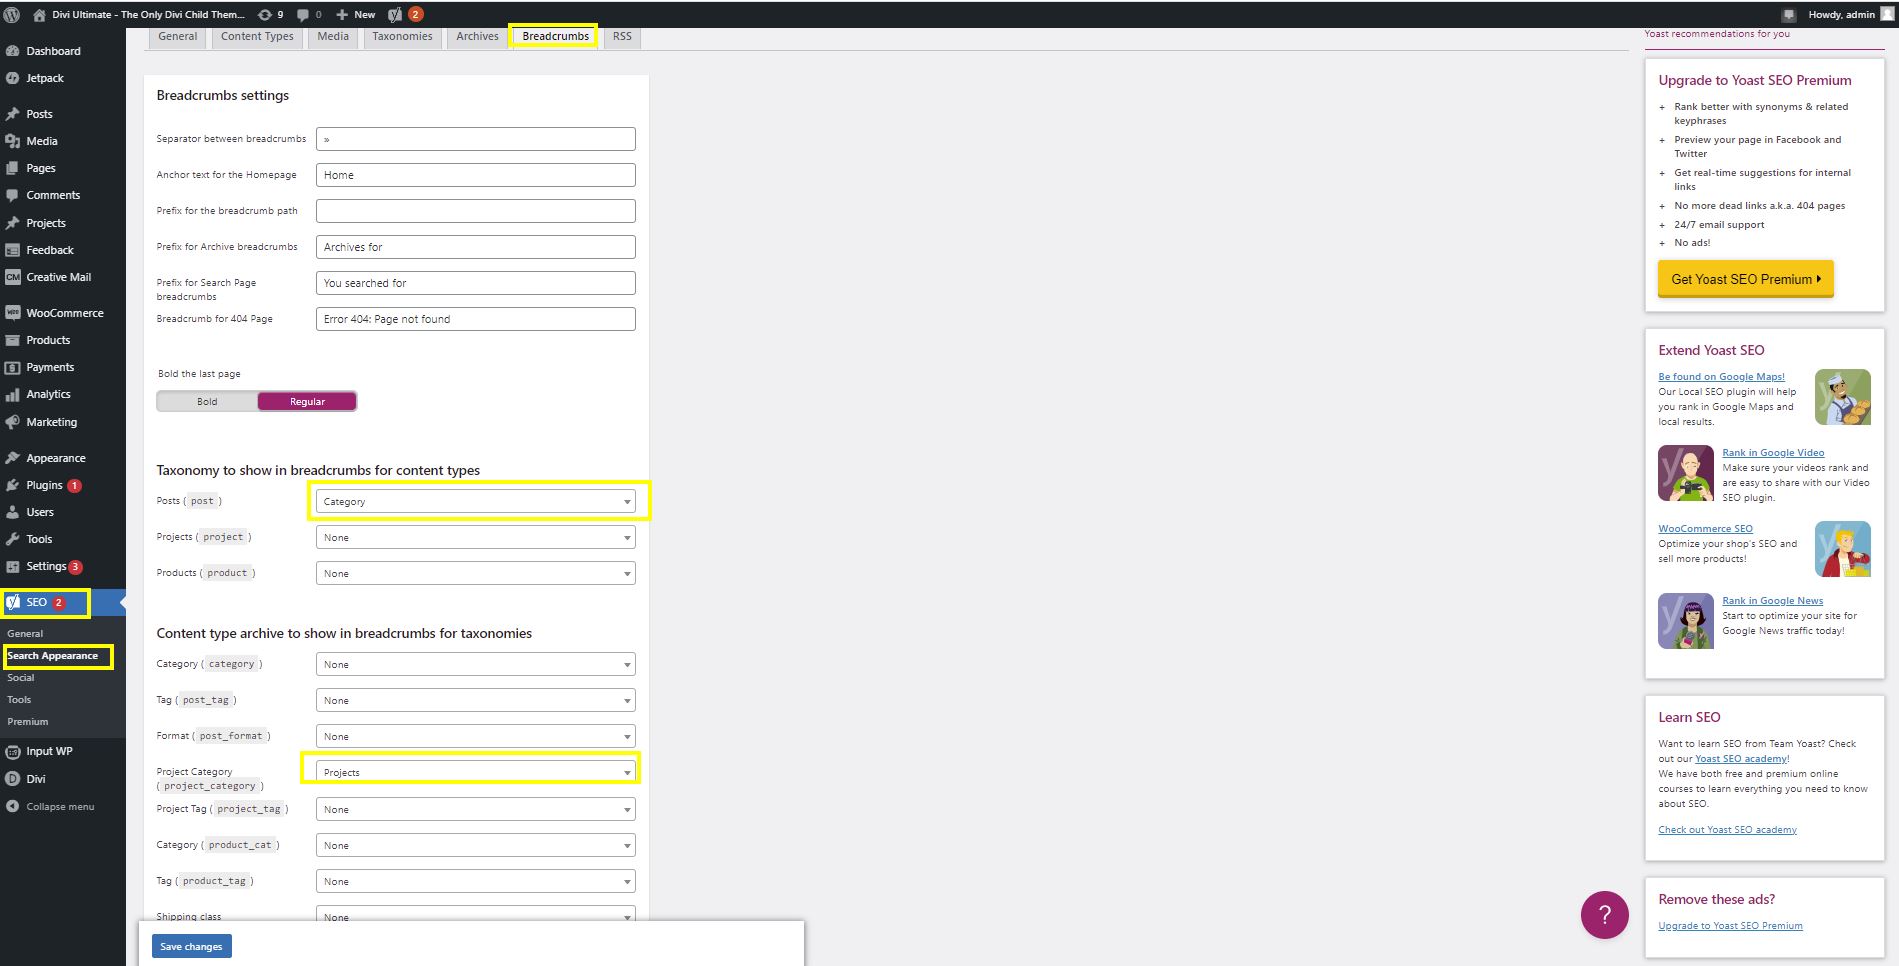
When installed and activated, click on SEO > Search Appearance > Breadcrumbs and select the categories as shown below:
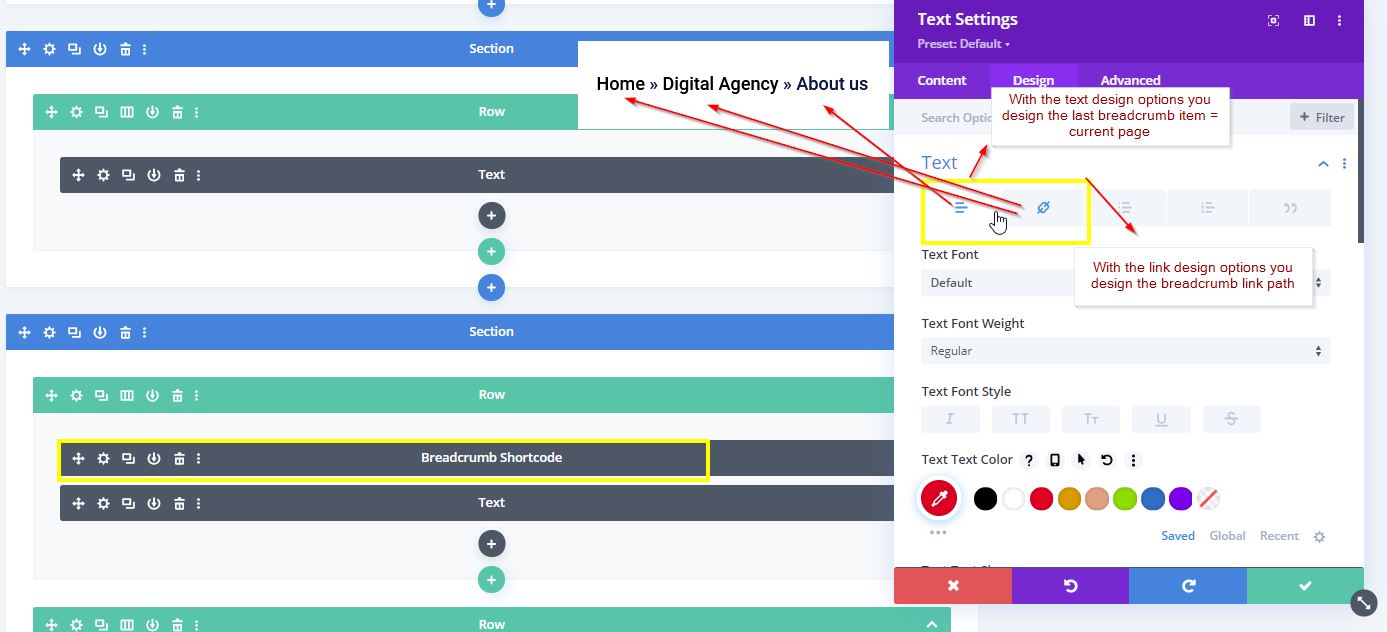
1. To use the Breadcrumb functionality on your pages you can place a text module anywhere on your posts, pages, or projects with this shortcode : [mybreadcrumb]
This shortcode will call the breadcrumb function anywhere on your site. On all pages, there is already this code implemented as text module with the label “Breadcrumb Shortcode“.
2. To style and modify e.g. text color or text size simply click on the design options and modify the values to your needs. The text design options are always for the last item = current page. The link design options design the link path to the last element.
→ e.g. Text Design is for (in bold): Home > Digital Agency > Services
→ e.g. Link Design is for (in bold): Home > Digital Agency > Services
4b. Installing recommended plugins | Using icons with WP Divi Icons
WP Divi Icons adds lots of new and cool designs to Divi which you can use as all other icons in the blurb modules. You can select, design and modify them as any other icon in the blurb modules
4c. Installing recommended plugins | WooCommerce
The WooCommerce Plugin is needed to run all functions from the Divi Online Store. Install the plugin as mentioned above from the WordPress Library and follow the instruction from WooCommerce.
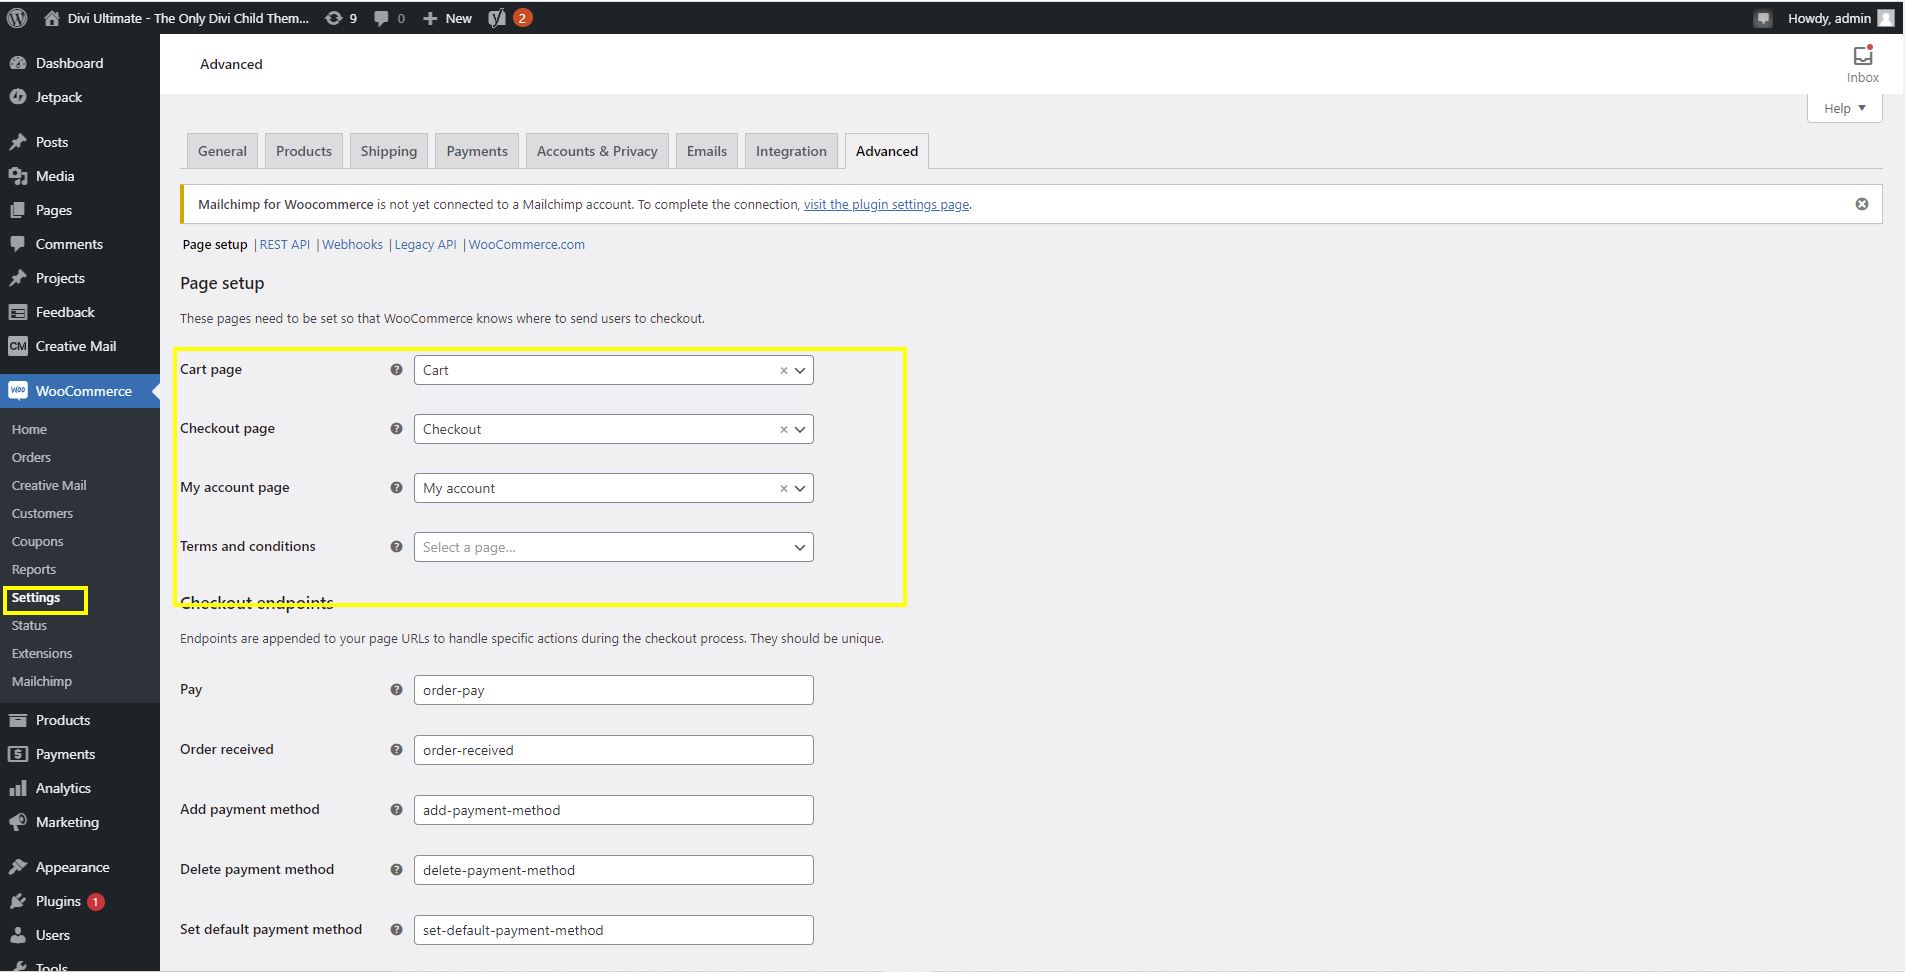
Navigate to WooCommerce > Settings and in the General tab fill in the usual information for your business, including currency, and save your changes.
Next, click on the Products tab and set the Shop page to “Shop” by selecting it from the drop-down menu. Save Changes.
If you need help, setting up WooCommerce, pls visit this blog from the Divi Team :
Getting Started With Divi and WooCommerce
The default pages for your shop should be the following ones:
4d. Installing recommended plugins | Date & Time Picker
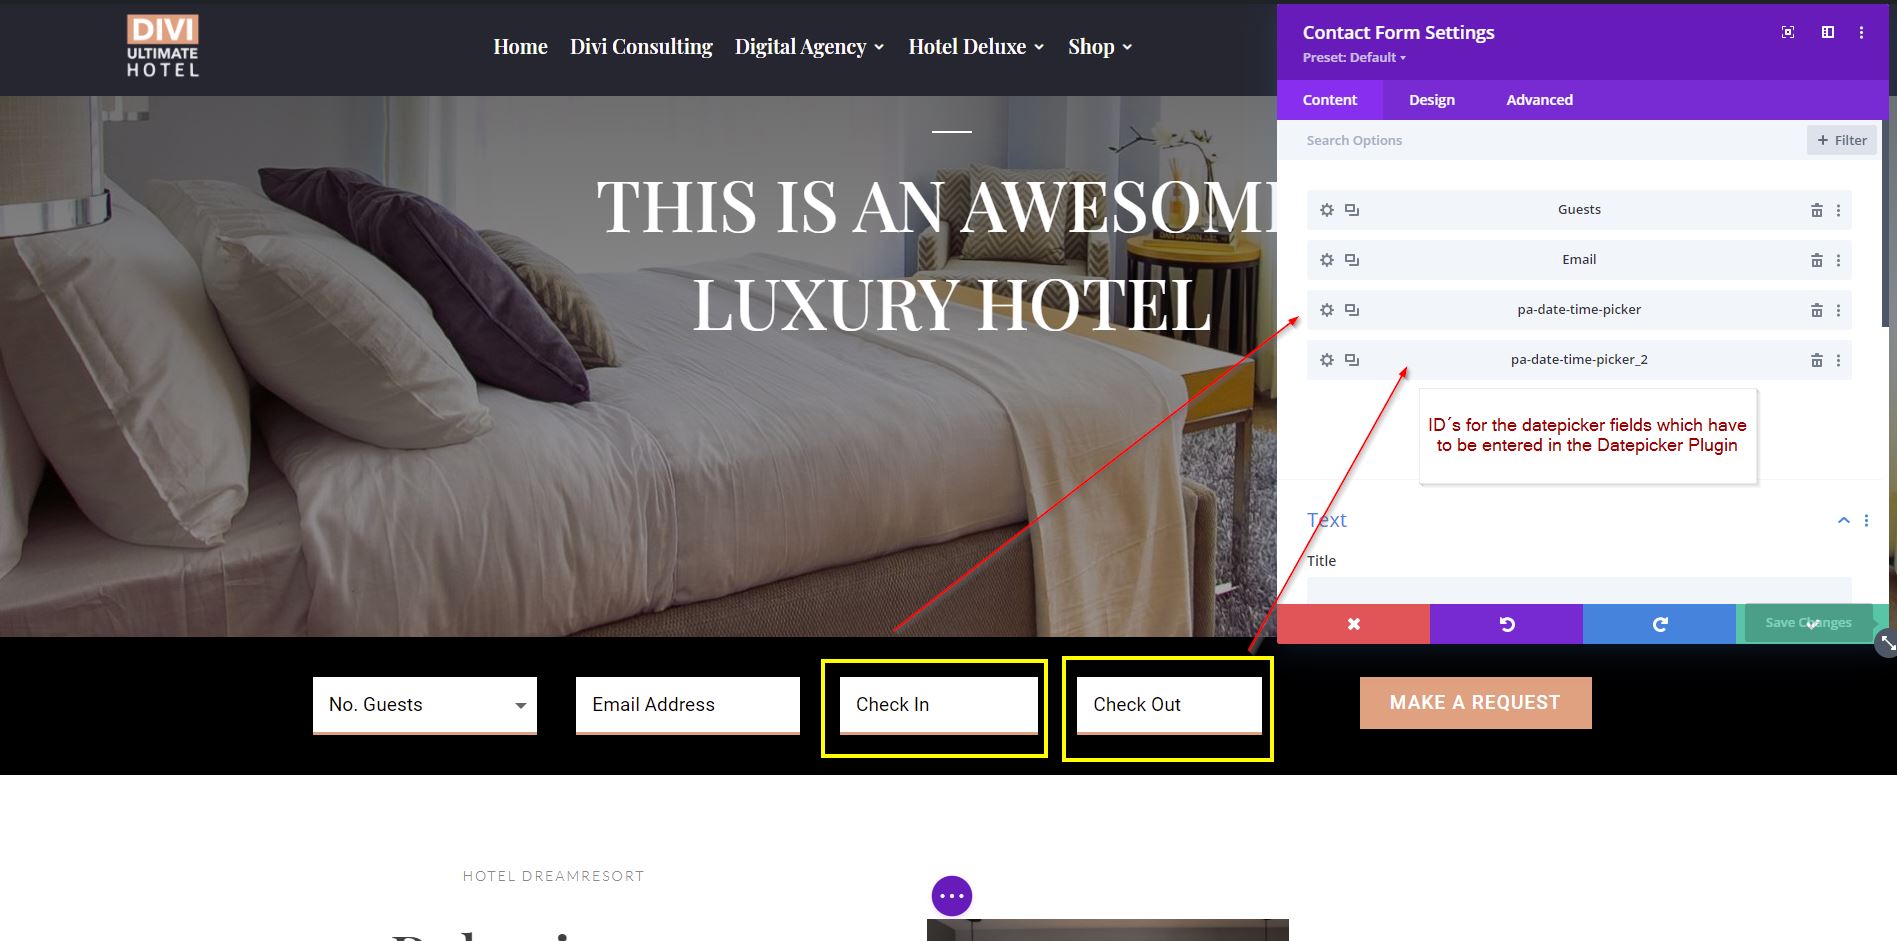
The Date & Time Picker Plugin is needed to ad the datepicker fields for Check In and Check Out to the contact form of the Deluxe Hotel layout.
1.) Once you have installed and activated the plugin as mentioned above, first go to the contact form on the Hotel Deluxe Home 2 Layout – You see that the 2 fields for the date have 2 different field ID´s
pa-date-time-picker > for the Check In Date
pa-date-time-picker_2 > for the Check Out Date
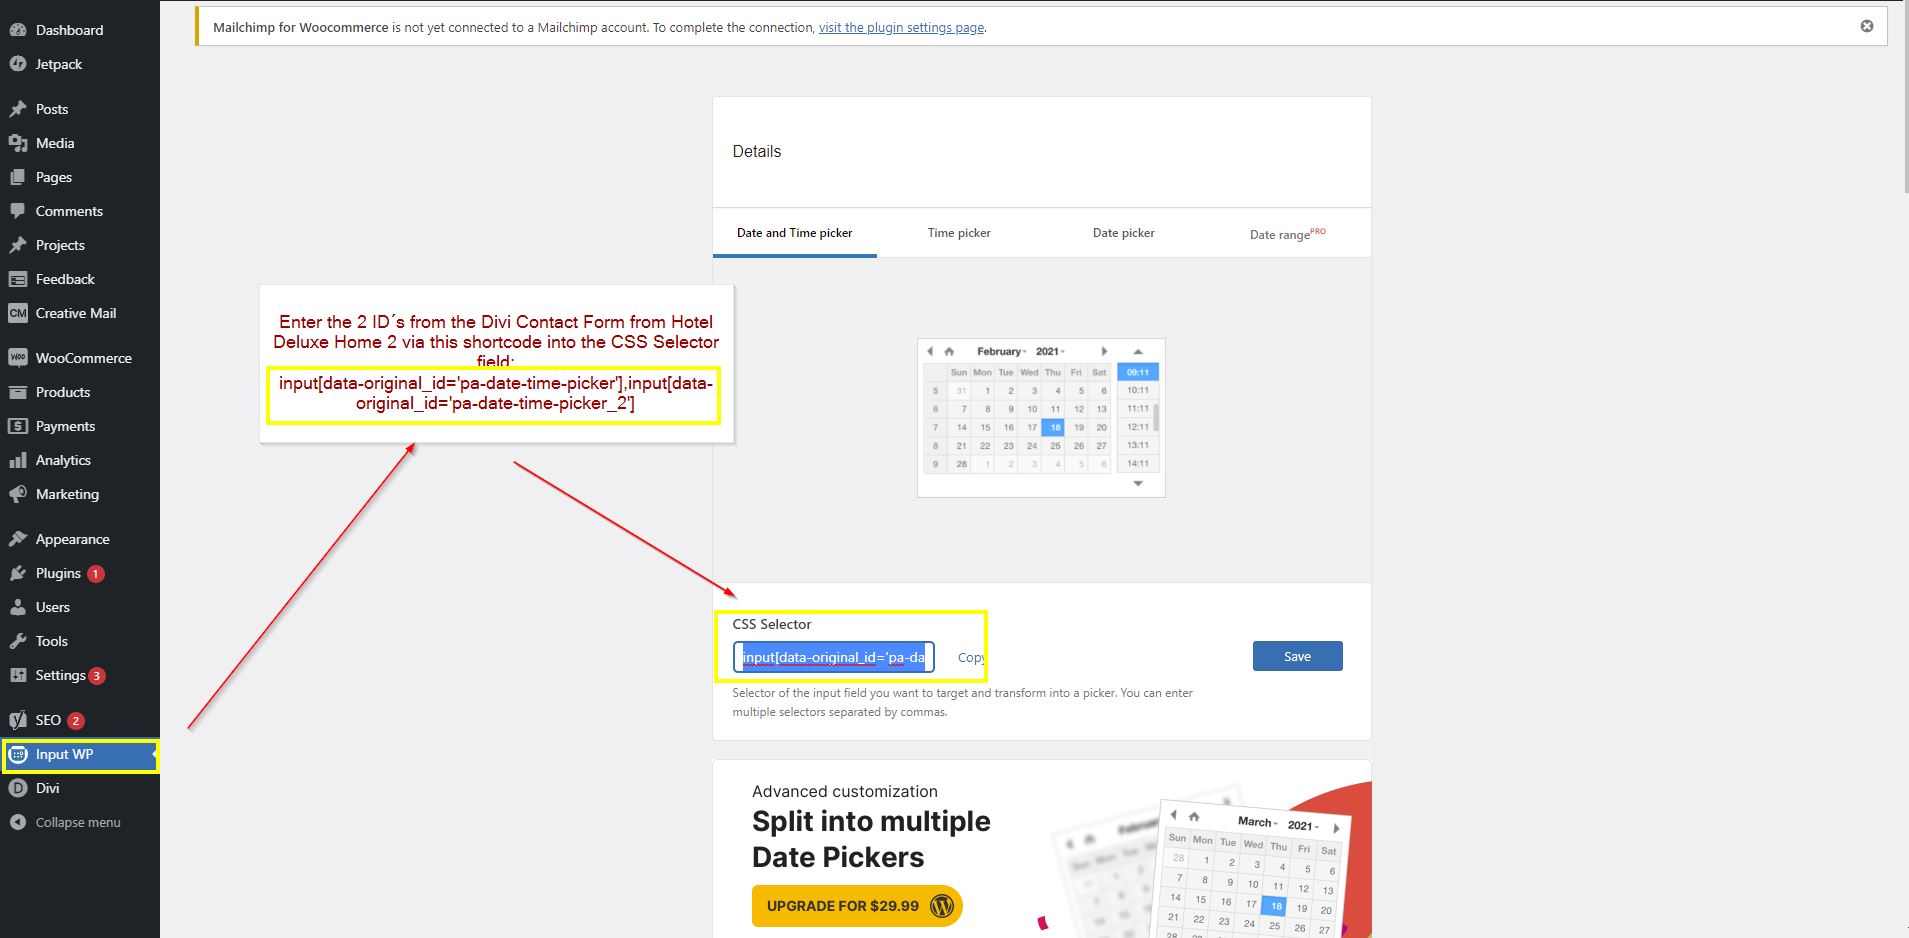
2.) Those 2 ID´s we have to integrate in the Date Picker Plugin to pull the datepicker function.
So you have to enter this code in the below mentioned field :
input[data-original_id=’pa-date-time-picker’],input[data-original_id=’pa-date-time-picker_2′]
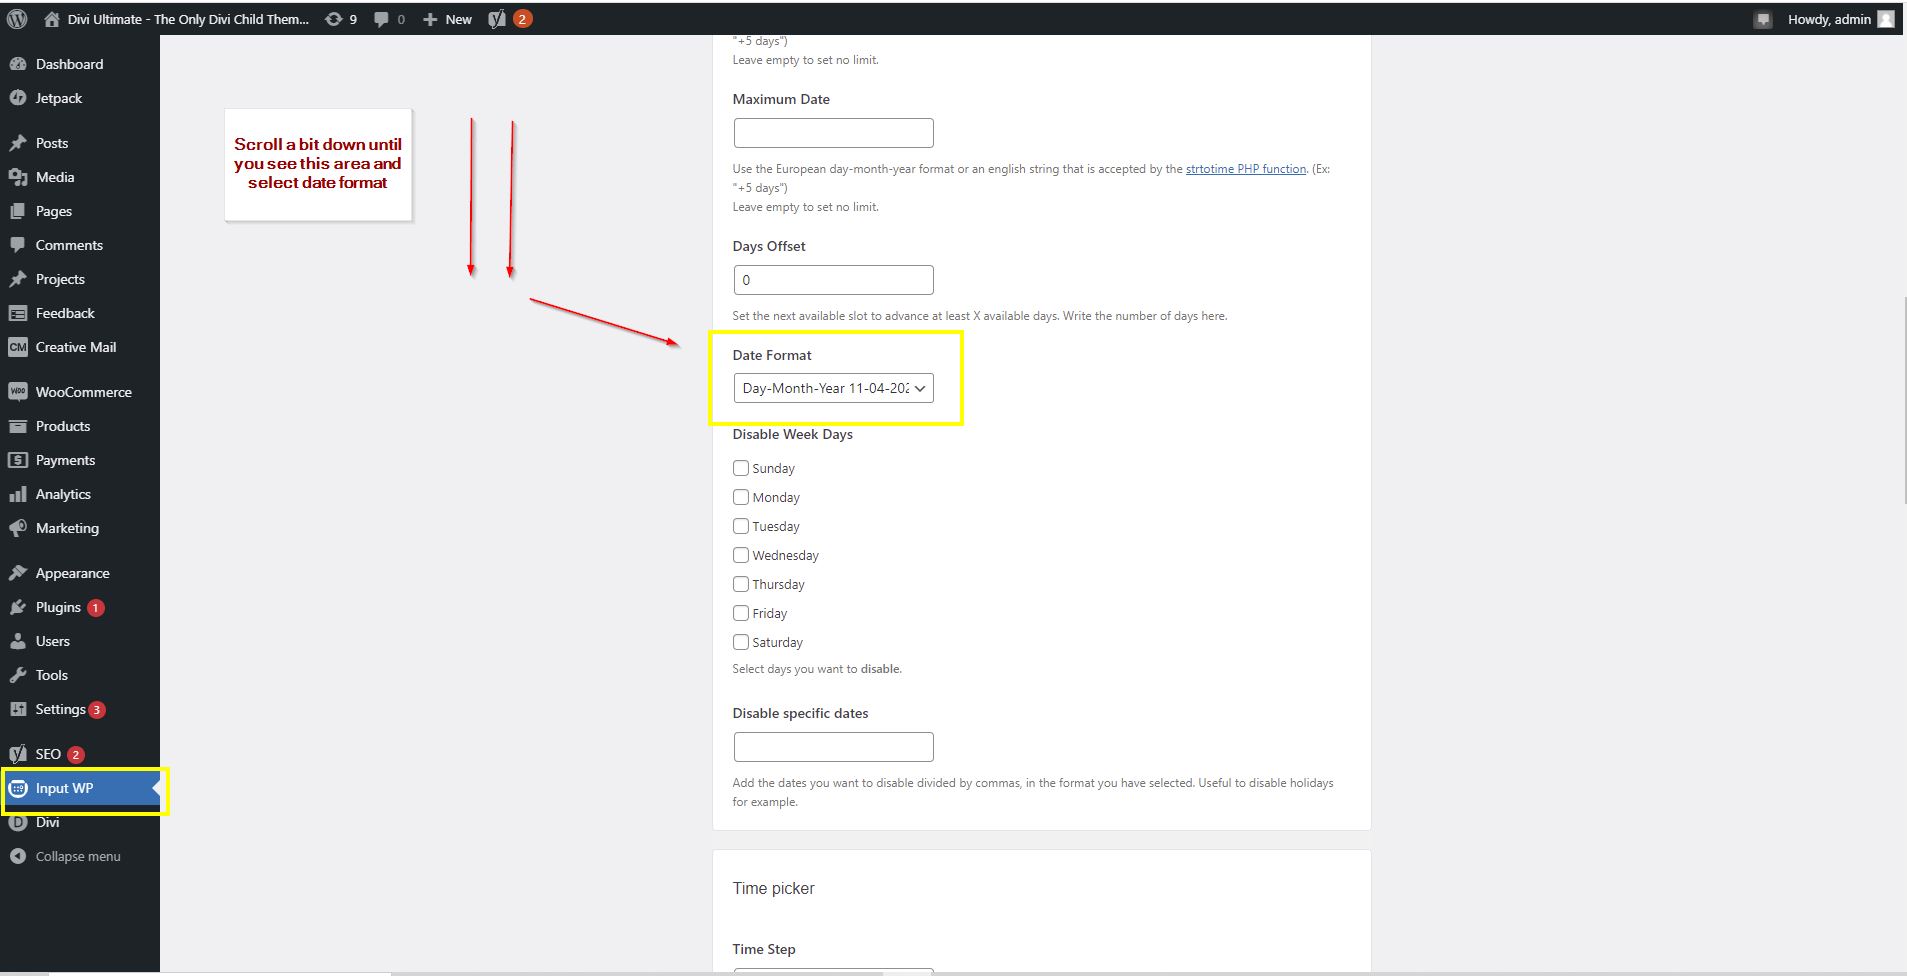
3.) Finally you can chose which date format you want to use. If you want to use the ones we use do the following.
5. Import Divi Ultimate Demo Data
With Divi Ultimate you have access to multiple pre-designed layouts for pages, headers and footers. The following steps show you how to install the demo content.
5a. Import all layouts for your PAGES
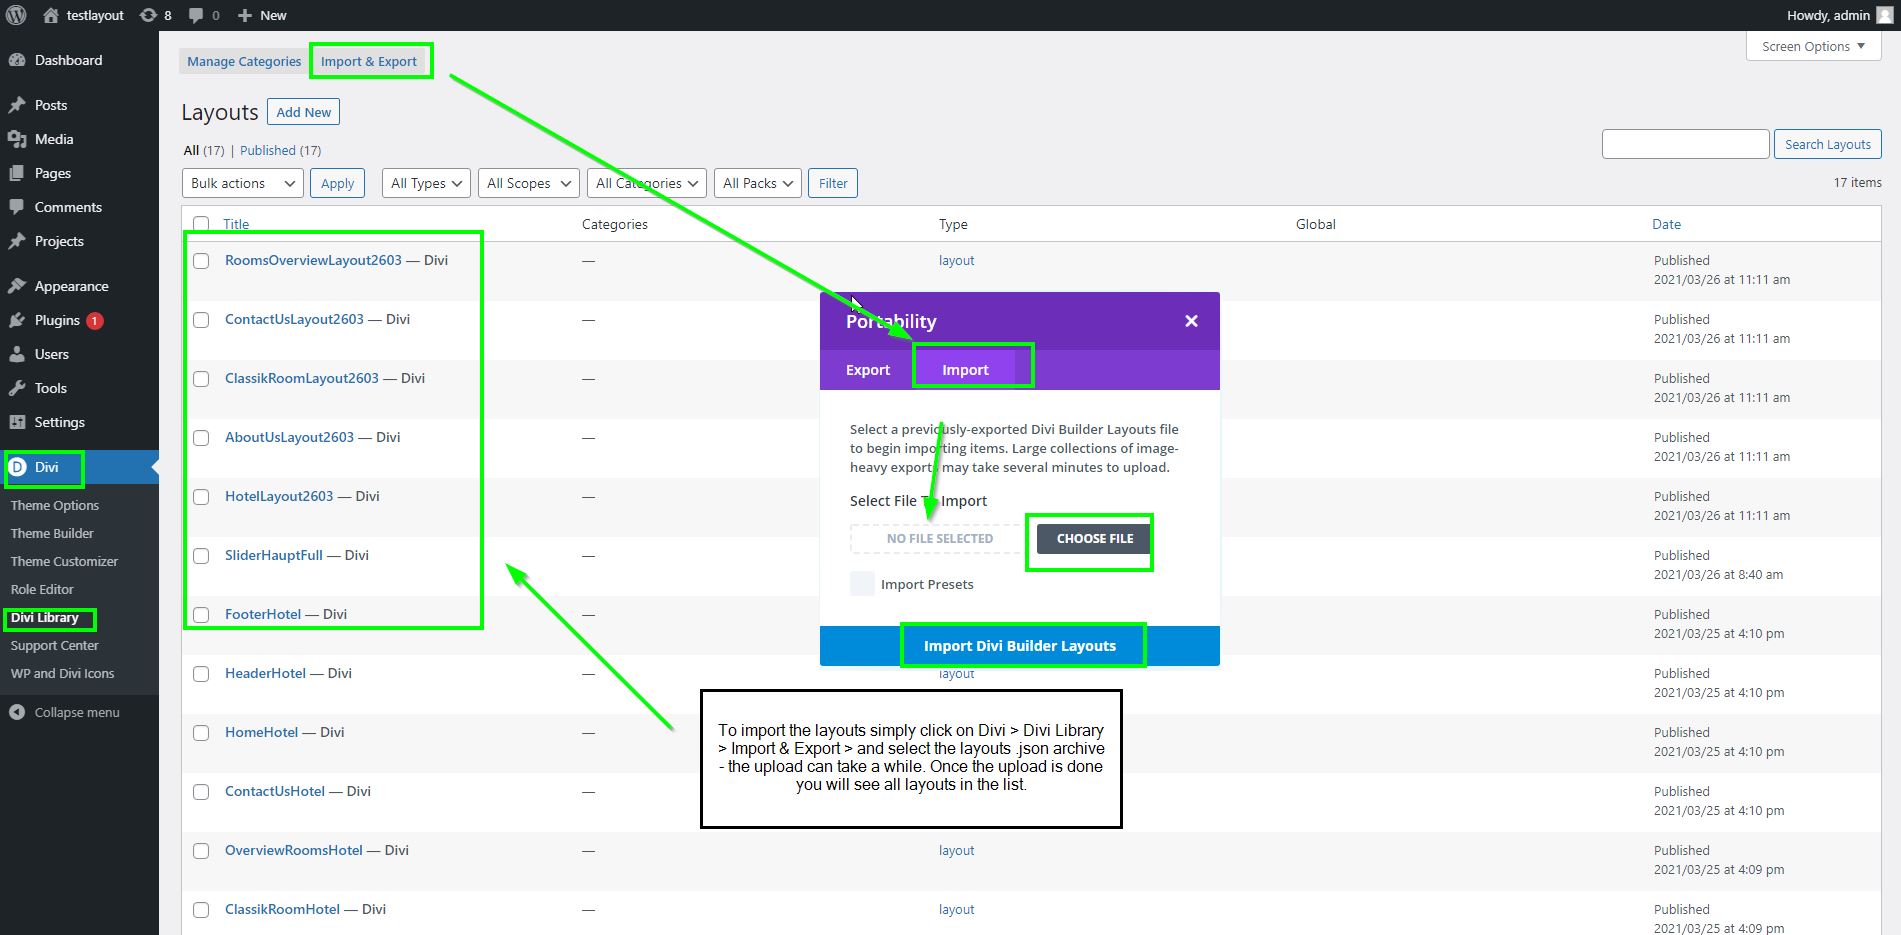
1. Click on Divi > Divi Library > Import & Export > then in the new window “Portability” choose the different layout files. There will be the following Layout files which contains all the layouts of the theme:
- DigitalAgencyLayouts.json
- DiviConsultingLayout.json
- DiviUltimateLayouts.json
- HotelDeluxeLayouts.json
- OnlineBlogLayout.json
- OnlineStoreLayout.json
Hint: Due to size of 20+ MB for one big file, the layouts are split into the above files to not overload the system.
2. Once you have uploaded the files you will see a screen similar to the above screen. You will see all layouts now in your Divi Library.
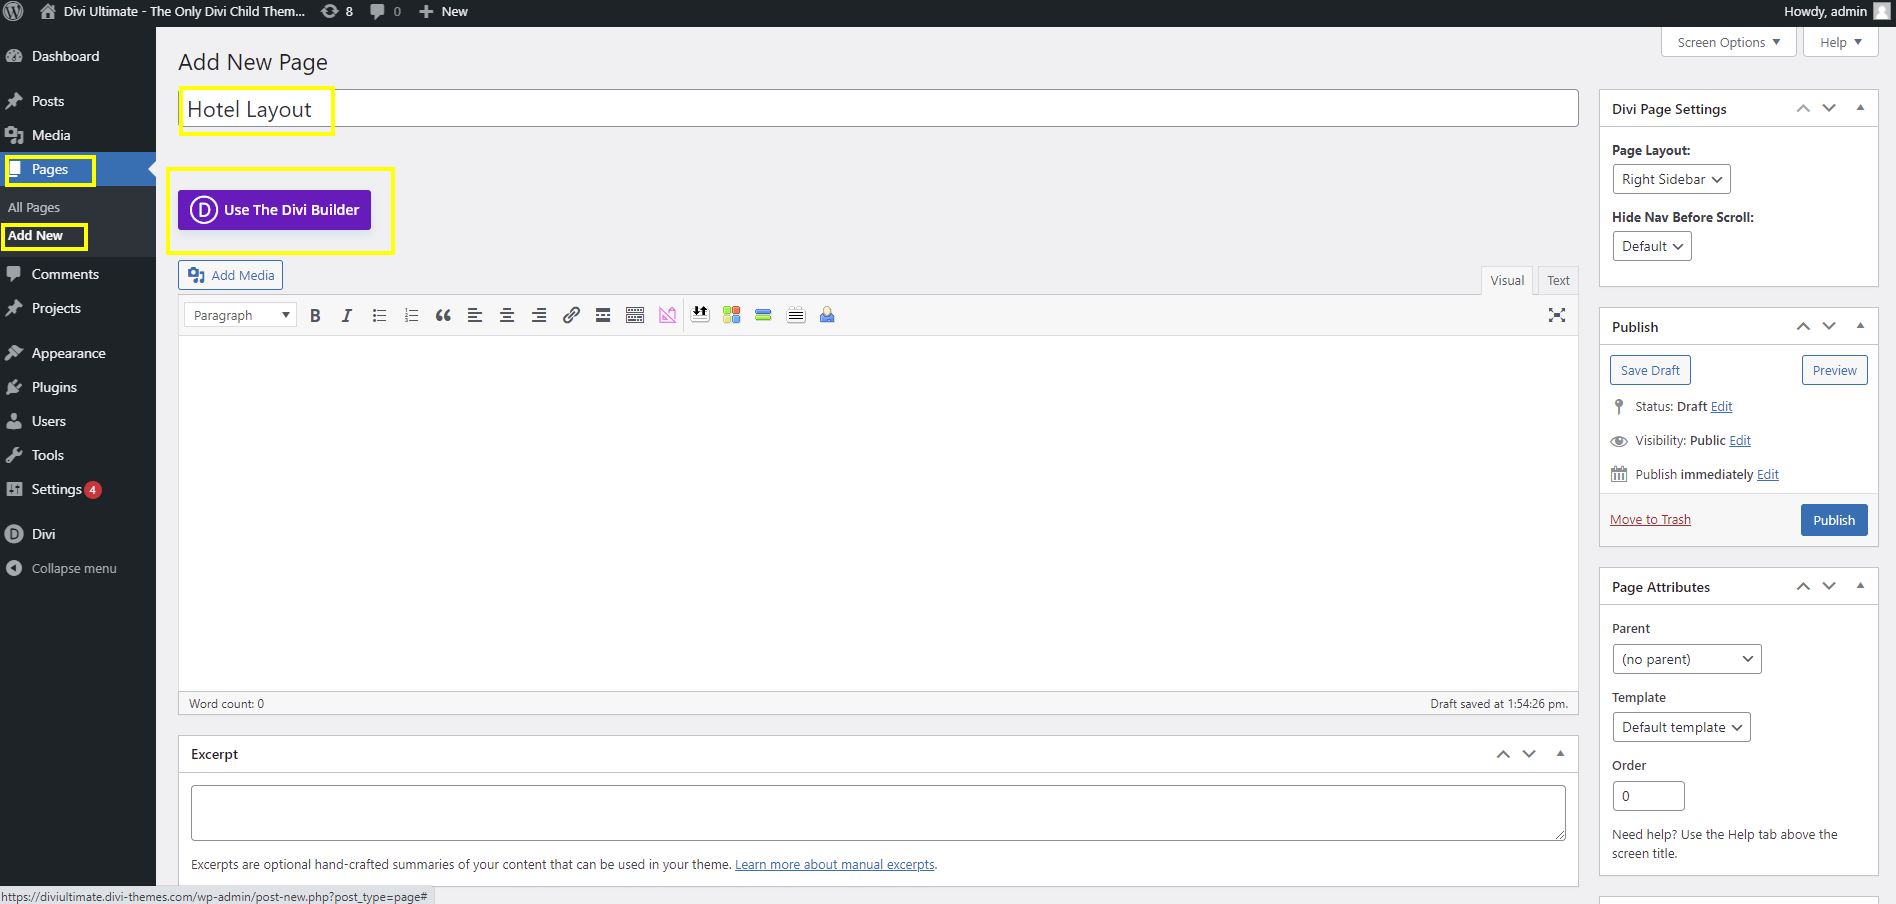
3. Now you can start creating your pages using all pre-designed layouts. Click on Pages > Add New. Then type in the page or post title and click on “Use The Divi Builder”
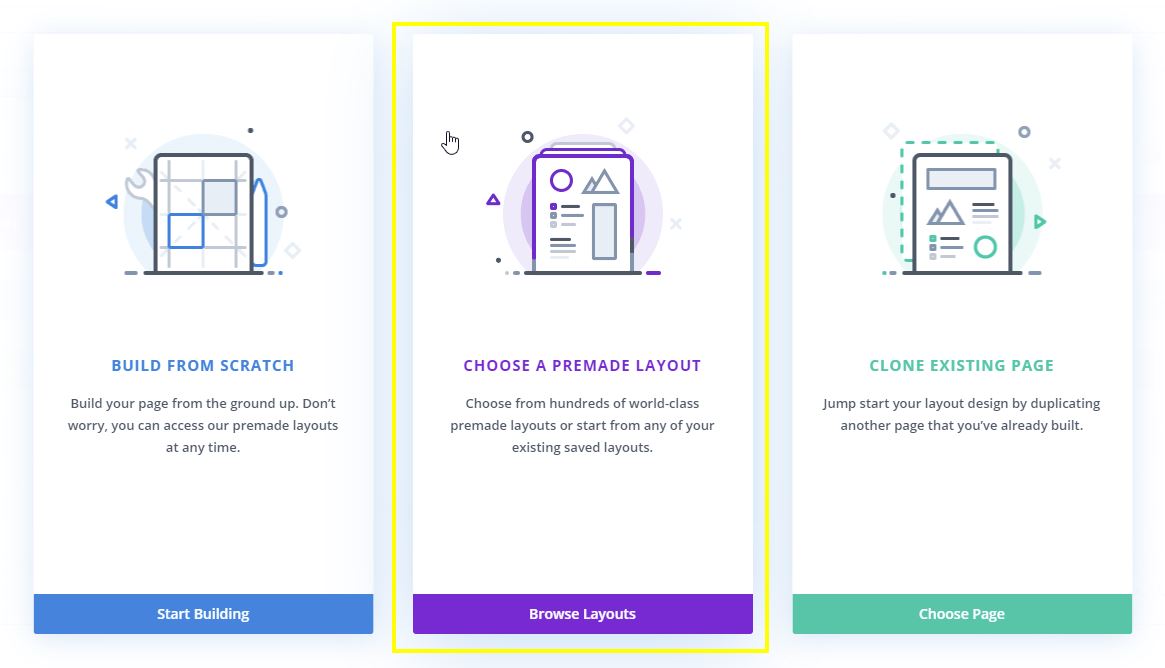
4. When done you will be asked what to do next with the following screen. Click on Choose a premade layout
5. In the next screen click on Your saved layouts. Then select the layout you want to use to import the demo content for this page.
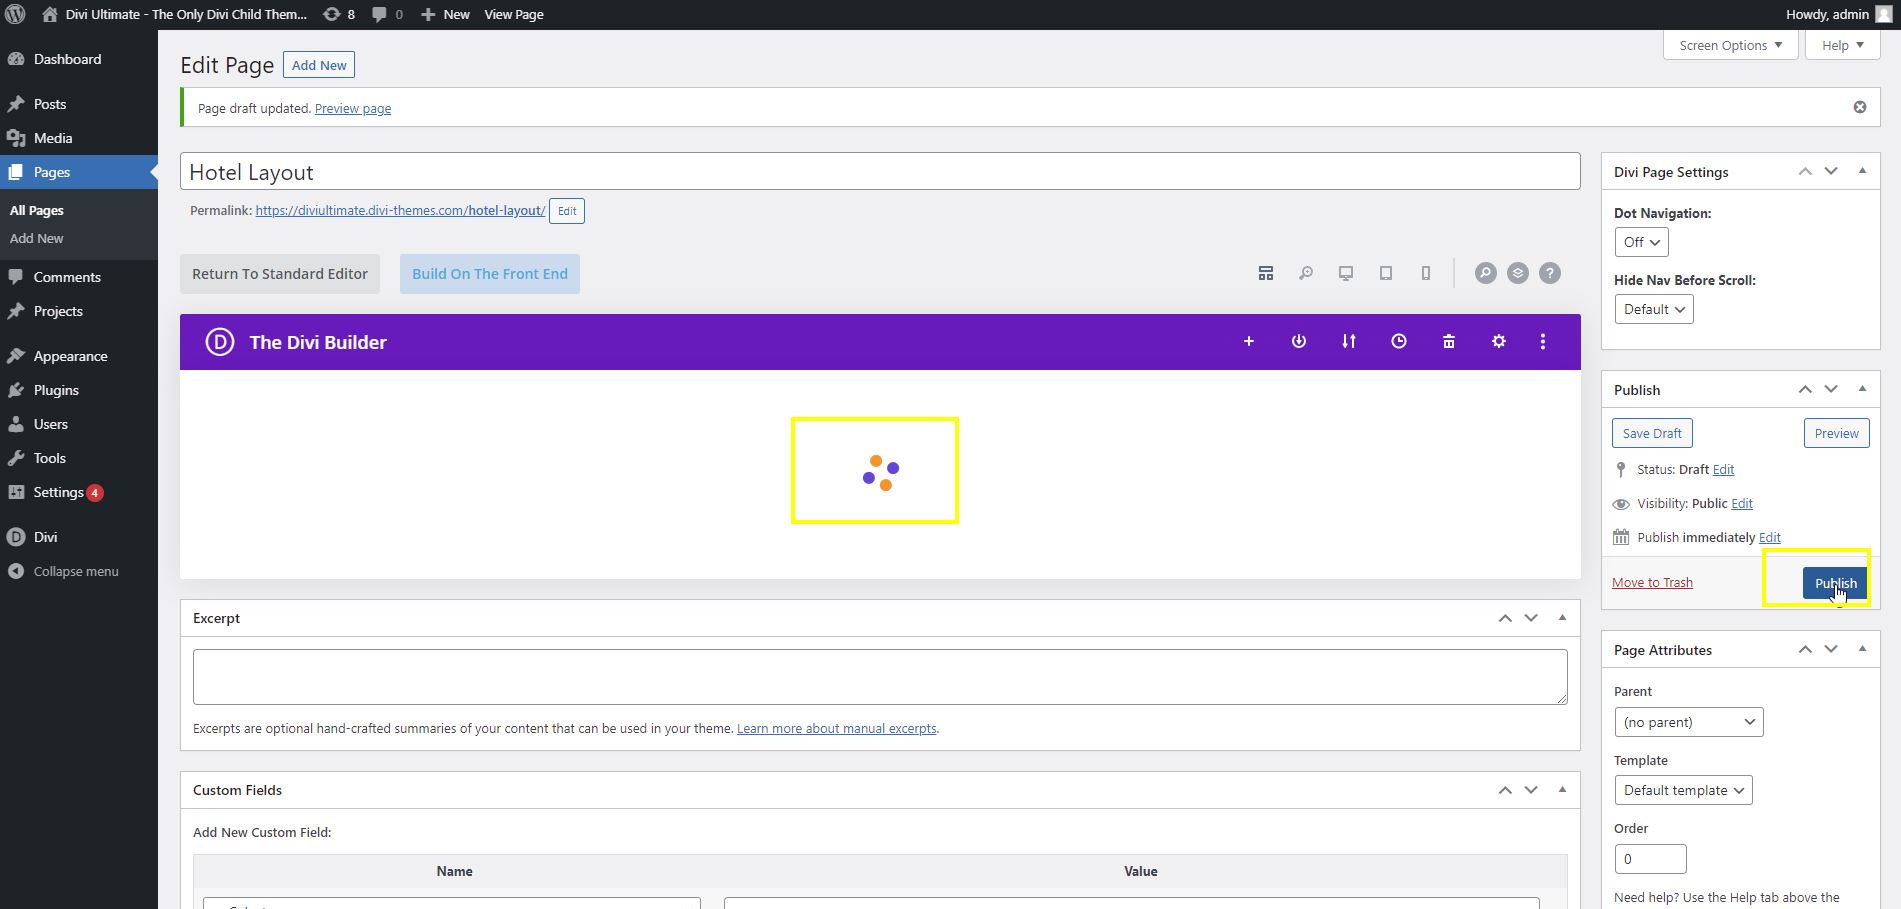
5a. HINT: It can happen that the loader keeps loading and loading. If this happens, still click on Publish and the page will load the demo content. This is a common Divi issue and if it for some reason does not work, pls. contact your Divi support.
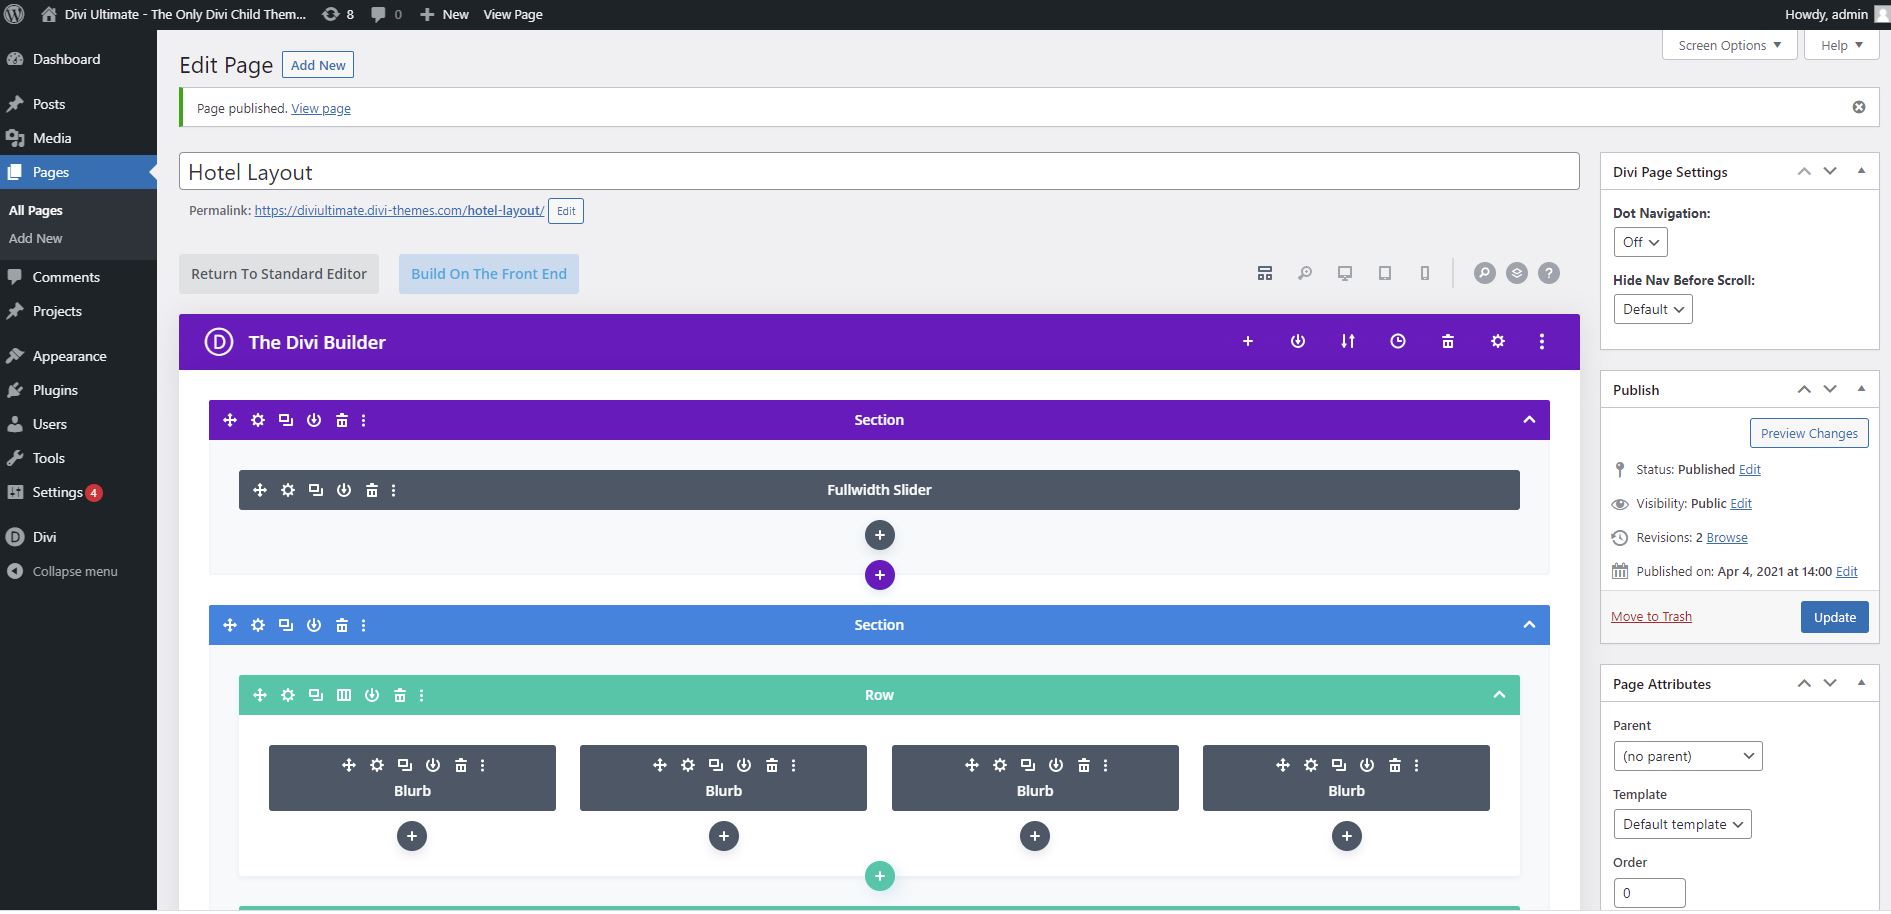
6. Once you have clicked on Publish the content appears on the page and you can start using it or just modify it to your needs.
5b. Import all layouts for your HEADER AND FOOTER
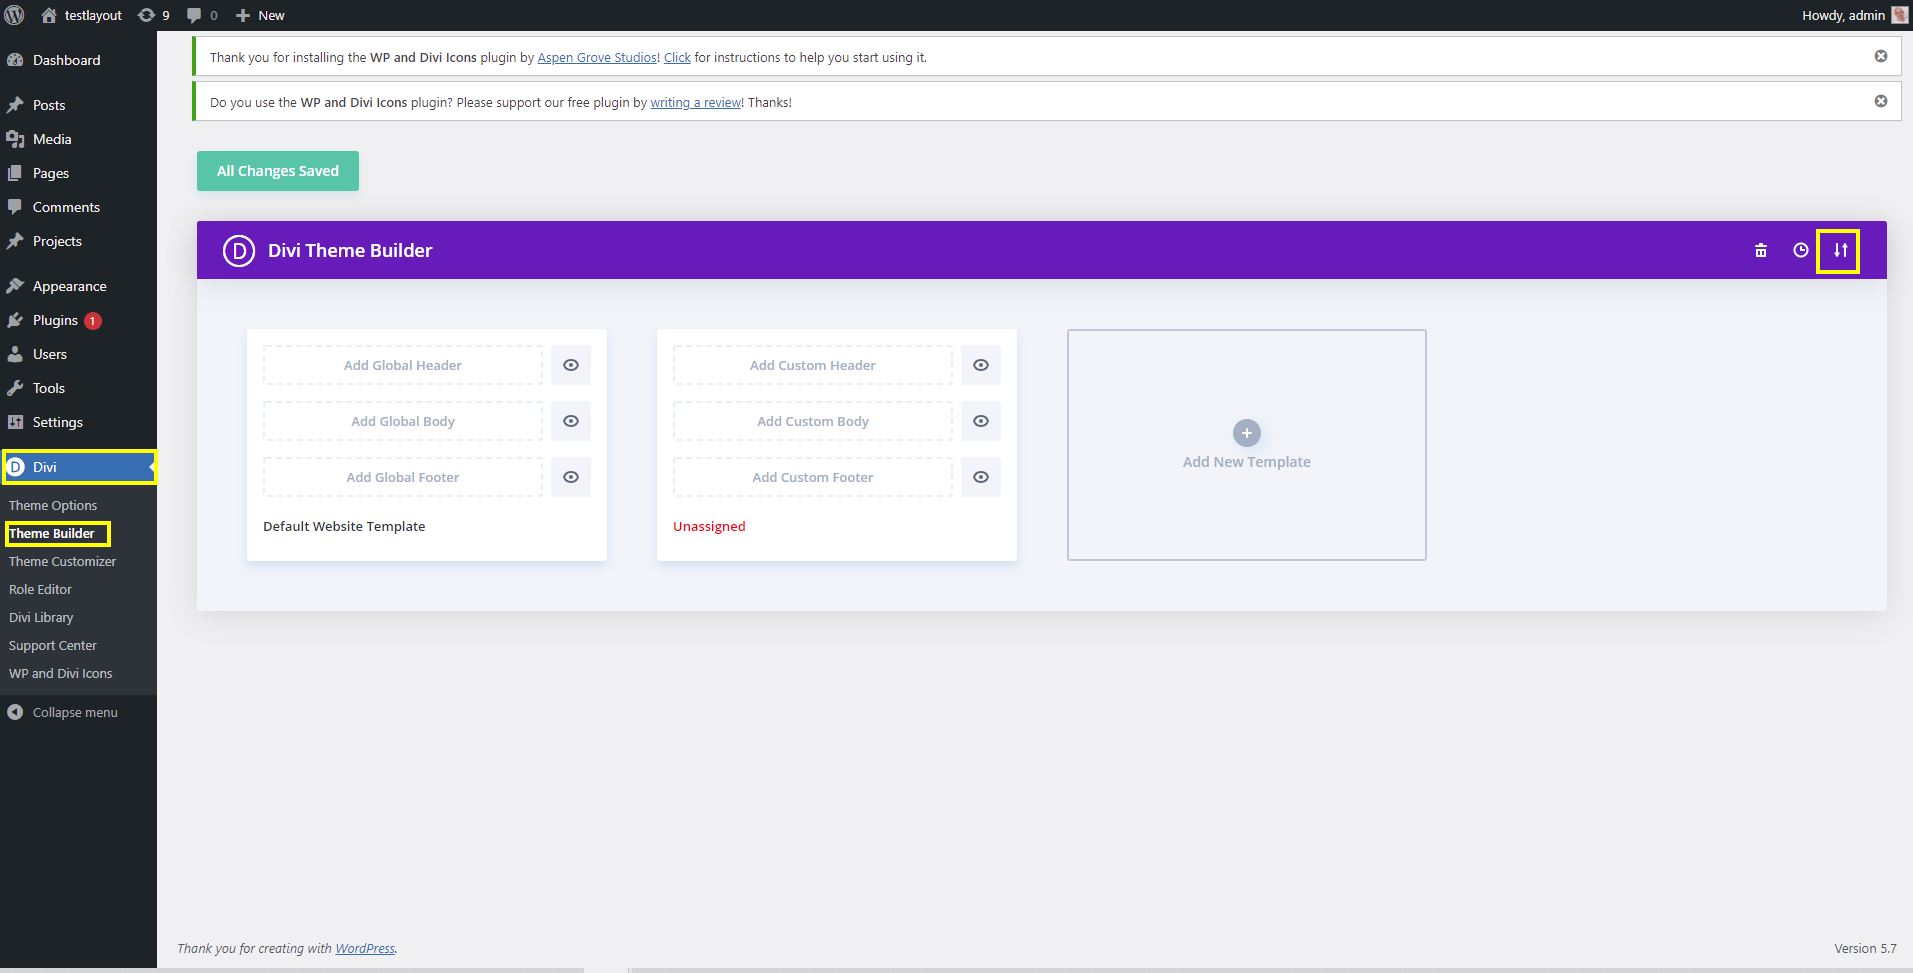
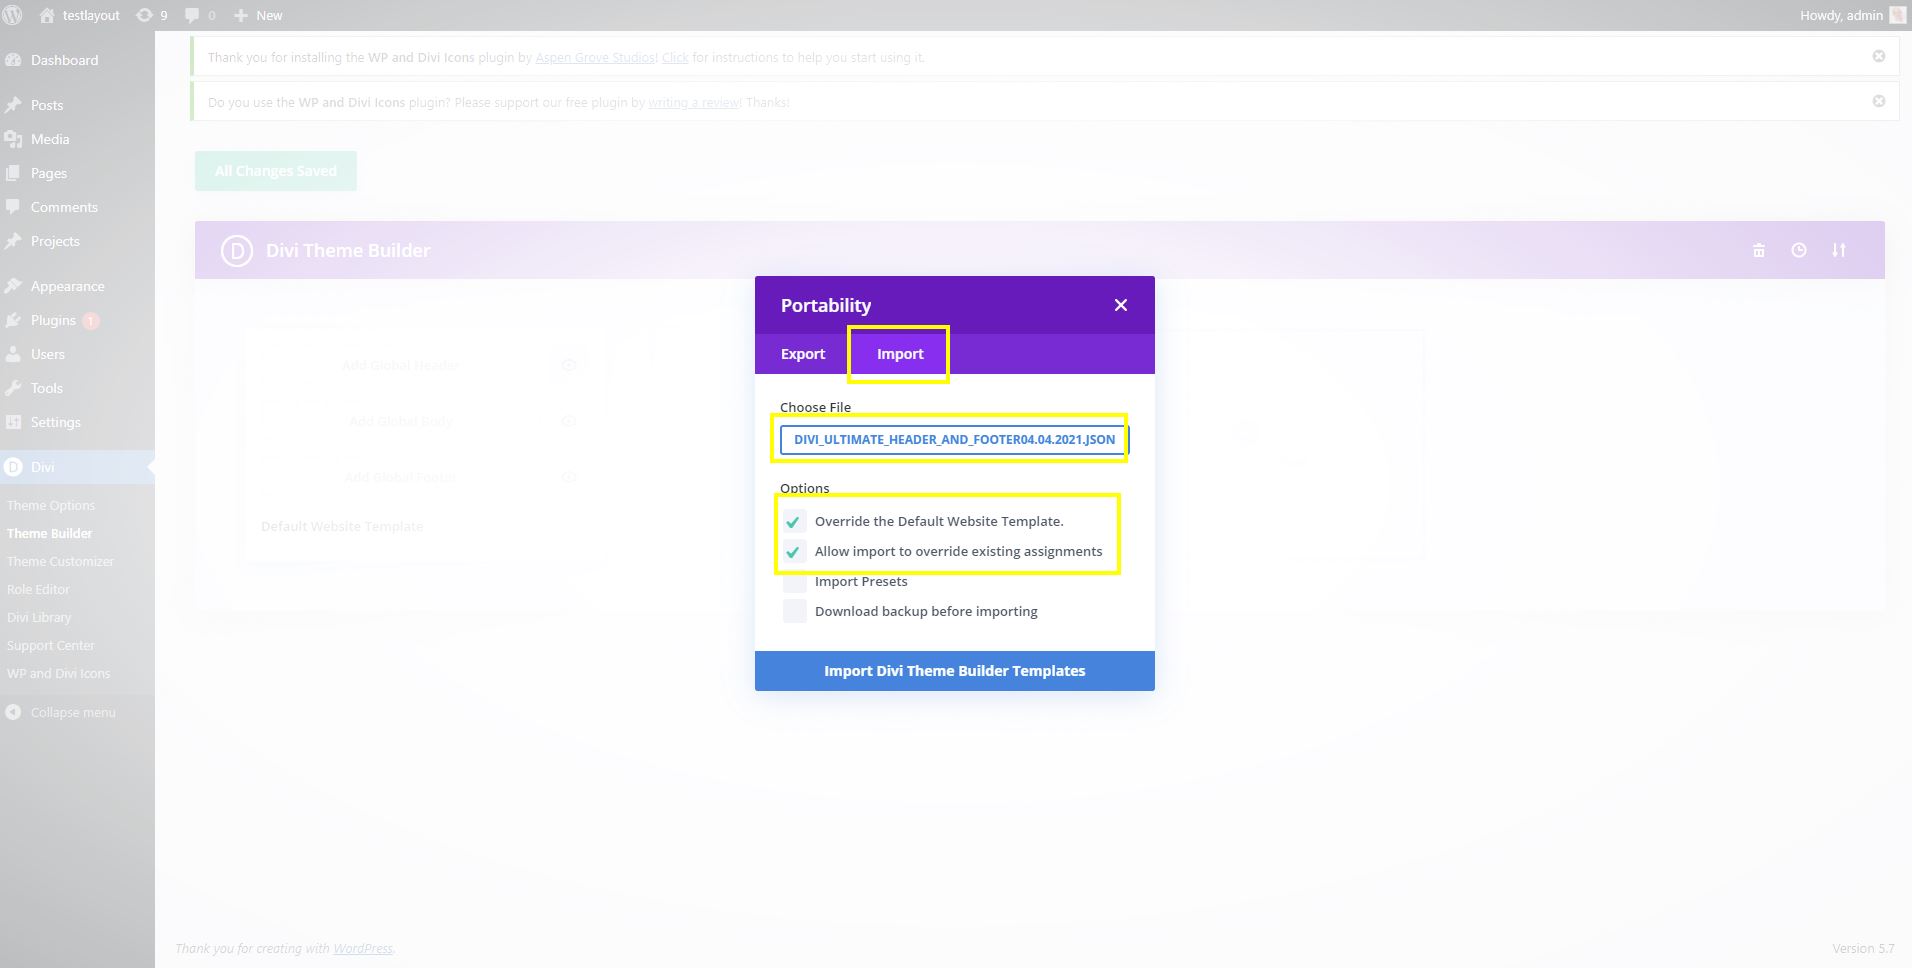
1. Click on Divi > Theme Builder > the 2 arrows at top right corner
3. Once you have uploaded the file you will see the header & footer areas.
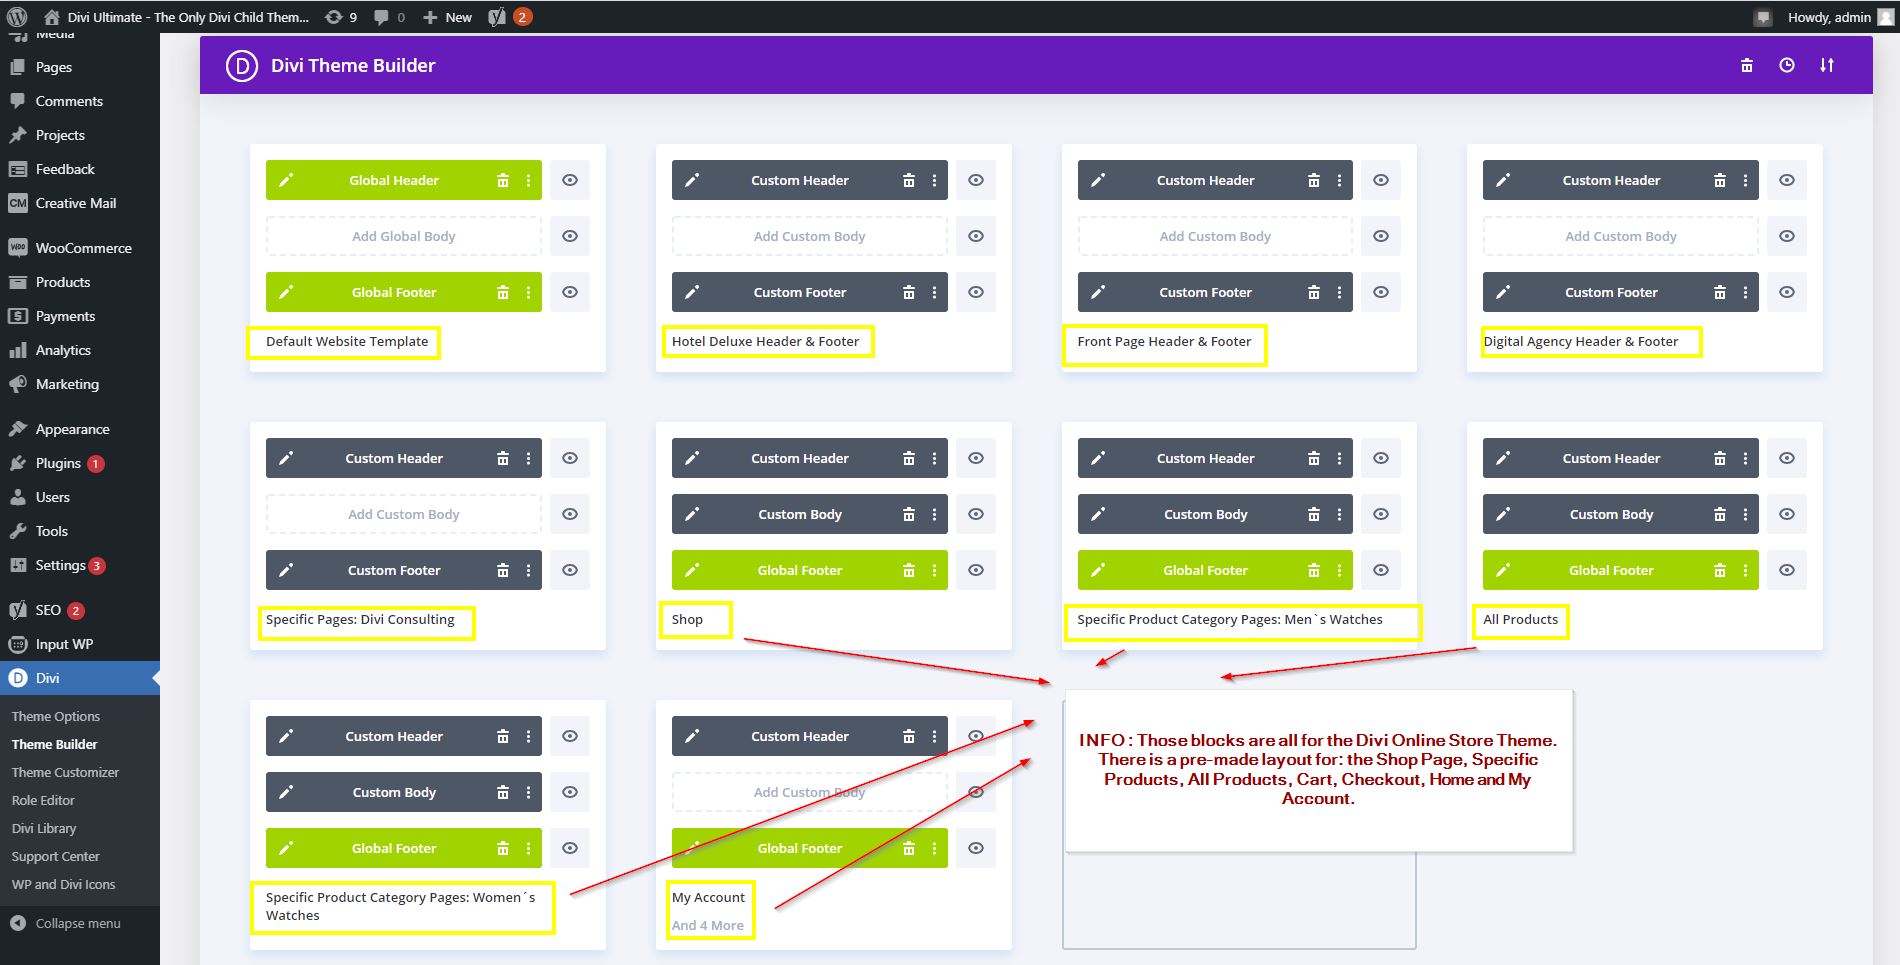
- Global Header & Footer
- Hotel Deluxe Header & Footer
- Front Page Header & Footer
- Digital Agency Header & Footer
- Divi Consulting Header & Footer
- Different Headers, Custom Body and the global Footer for the Divi Online Store Theme
These blocks are the pre-designed headers and footers for the different themes or layouts and the one for the global layout. Once you have them in your Theme Builder library click on save changes.
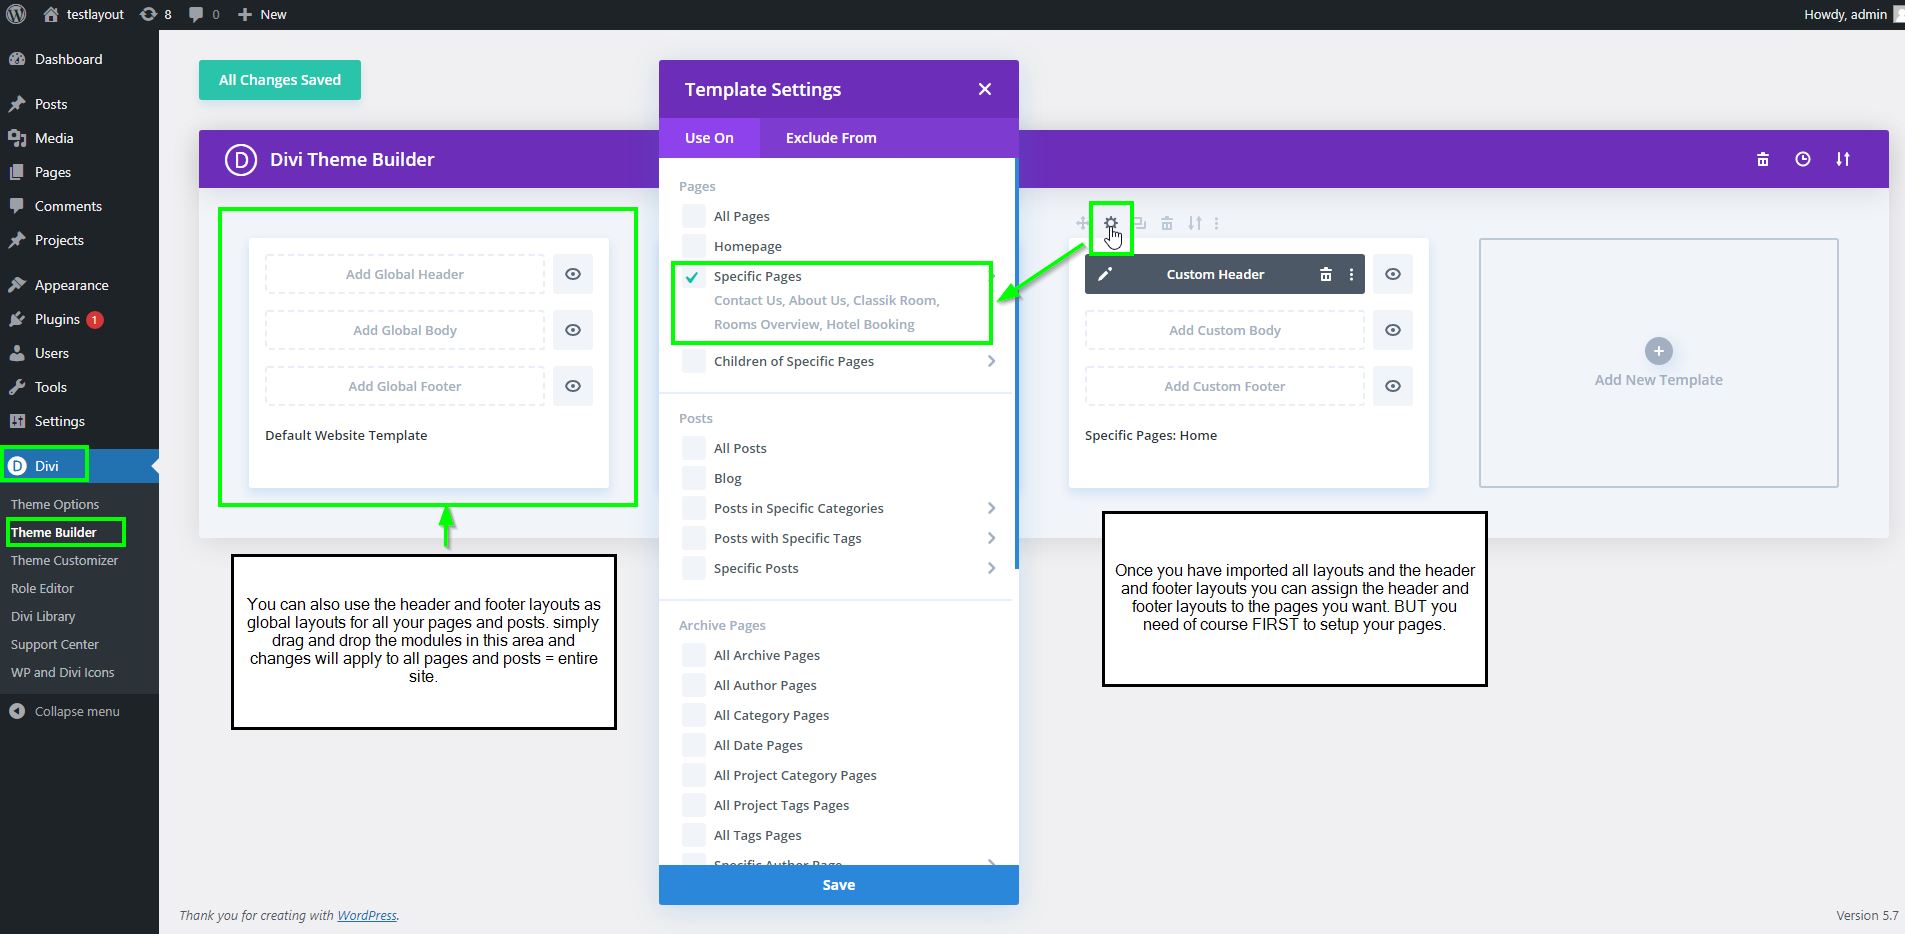
4. Now you can start assigning the headers and footers to your pages how you want. Of course you can use also only one header and footer design for your entire site. In this case, click on Default Website Template and drag&drop the wanted headers and footers in the fields.
6. Import all Divi Theme Options
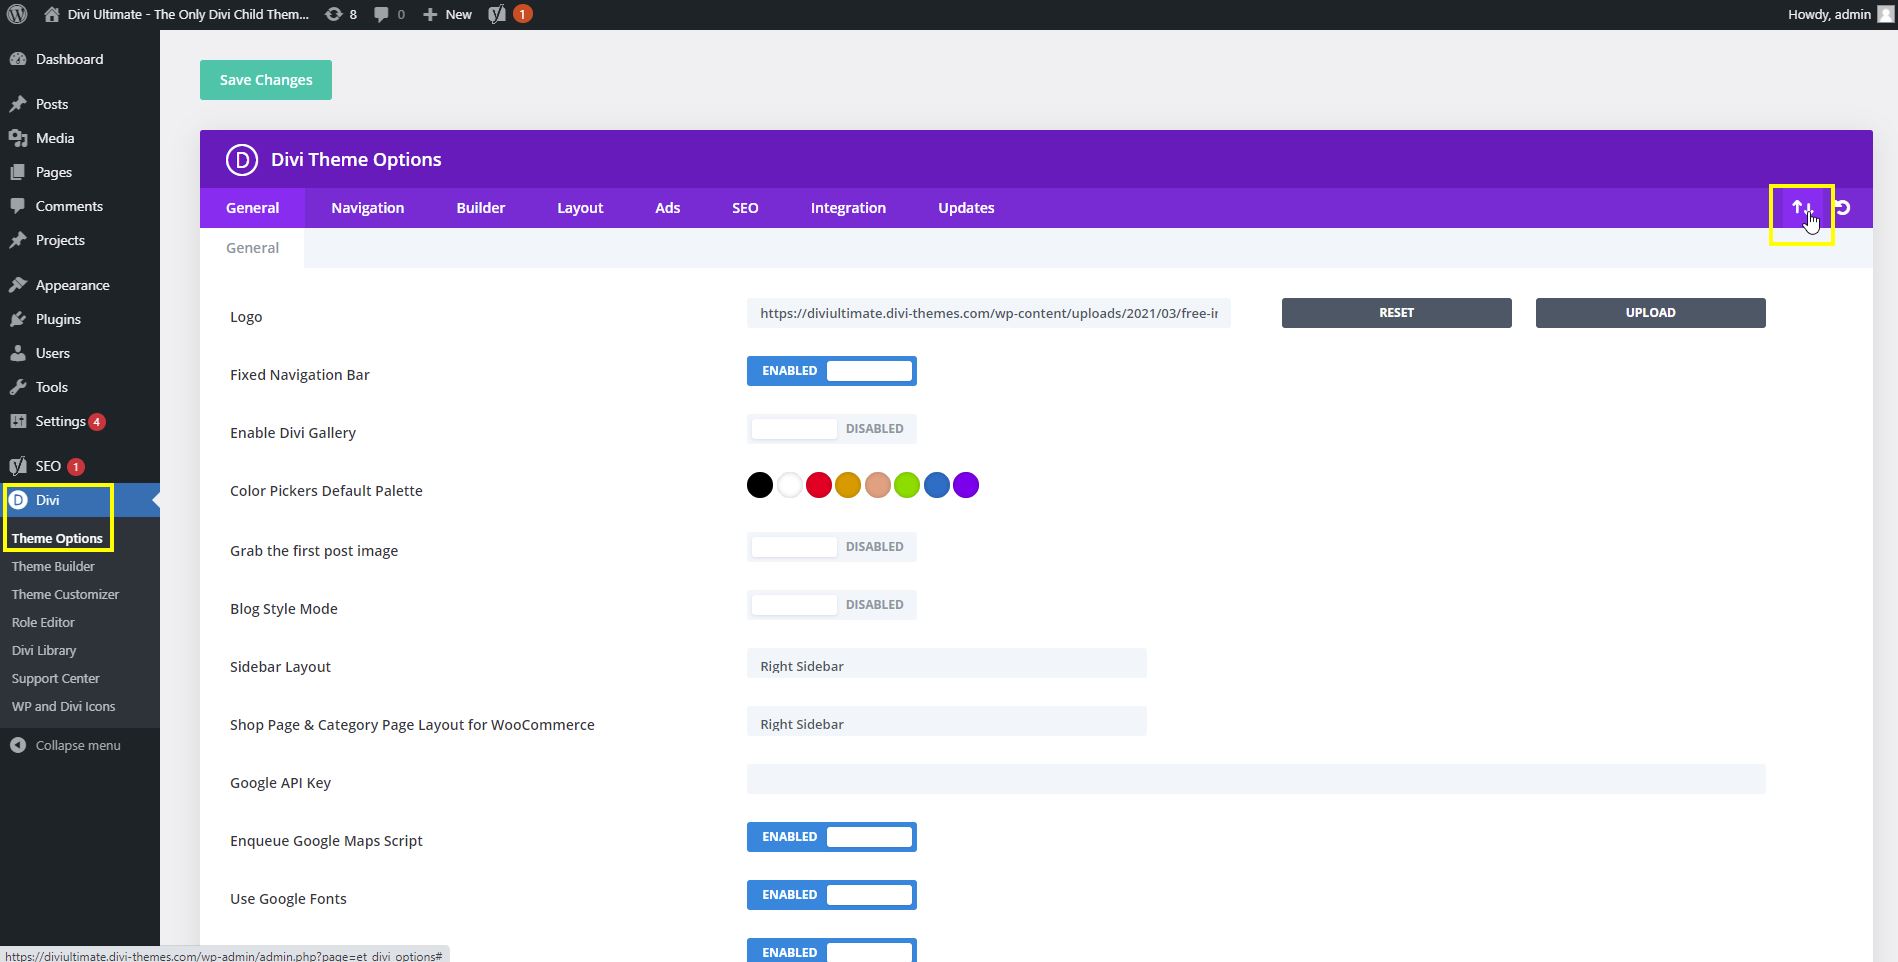
1. Click on Divi > Theme Options > the 2 arrows at top right corner
2. Then in the window Portability click on import and select the file Divi_Ultimate_Theme_Optionsxx.xx.xxxx.json and upload the file.
3. When done, you will have all settings imported.
HINT: Under Divi > Theme Options > Integrations > you will find this code. Don´t change this code as this code will call the menu functions for header for the front page. If you don´t use the front page header design, you can delete it – but it´s not necessary to touch this area at all.
7. Header Menu Styling Options
Divi Ultimate comes with great pre-defined header menu layouts.
- Global Header
- Front Page Header
- Hotel Deluxe Header
- Digital Agency Header
- Divi Consulting Header
- Divi Online Store
The headers for the Global Header and Hotel Deluxe can be modified with the known Divi styling options. There is nothing special code or functions added. Just open the header and modify it how you want.
The headers for Digital Agency, Divi Consulting, Divi Online Store, Divi Hotel and FrontPage have in addition to the standard Divi Design Options some unique styling options and special lines of codes which we explain in the following section.
7a. Header Menu Styling Options | The Front Page Header
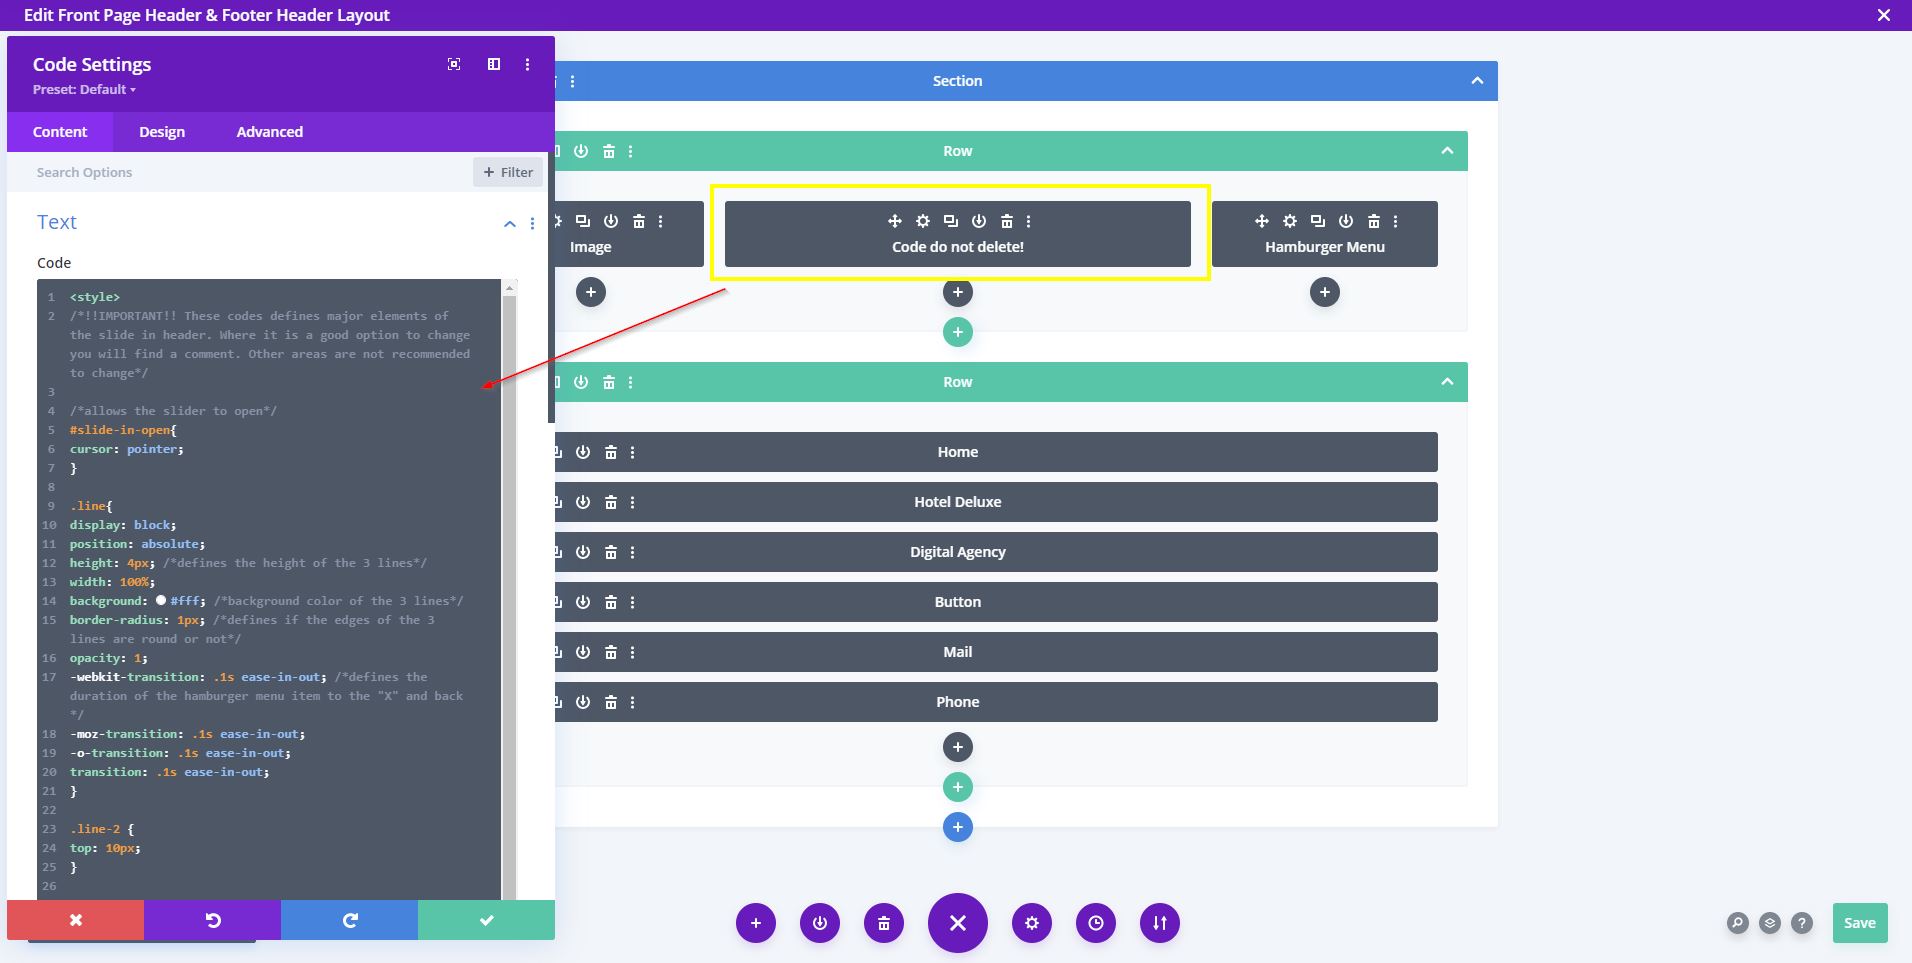
The Front Page Header is the only header that has following special line of codes under Divi > Theme Options > Integration
Just don´t delete those lines 🙂 That´s it.
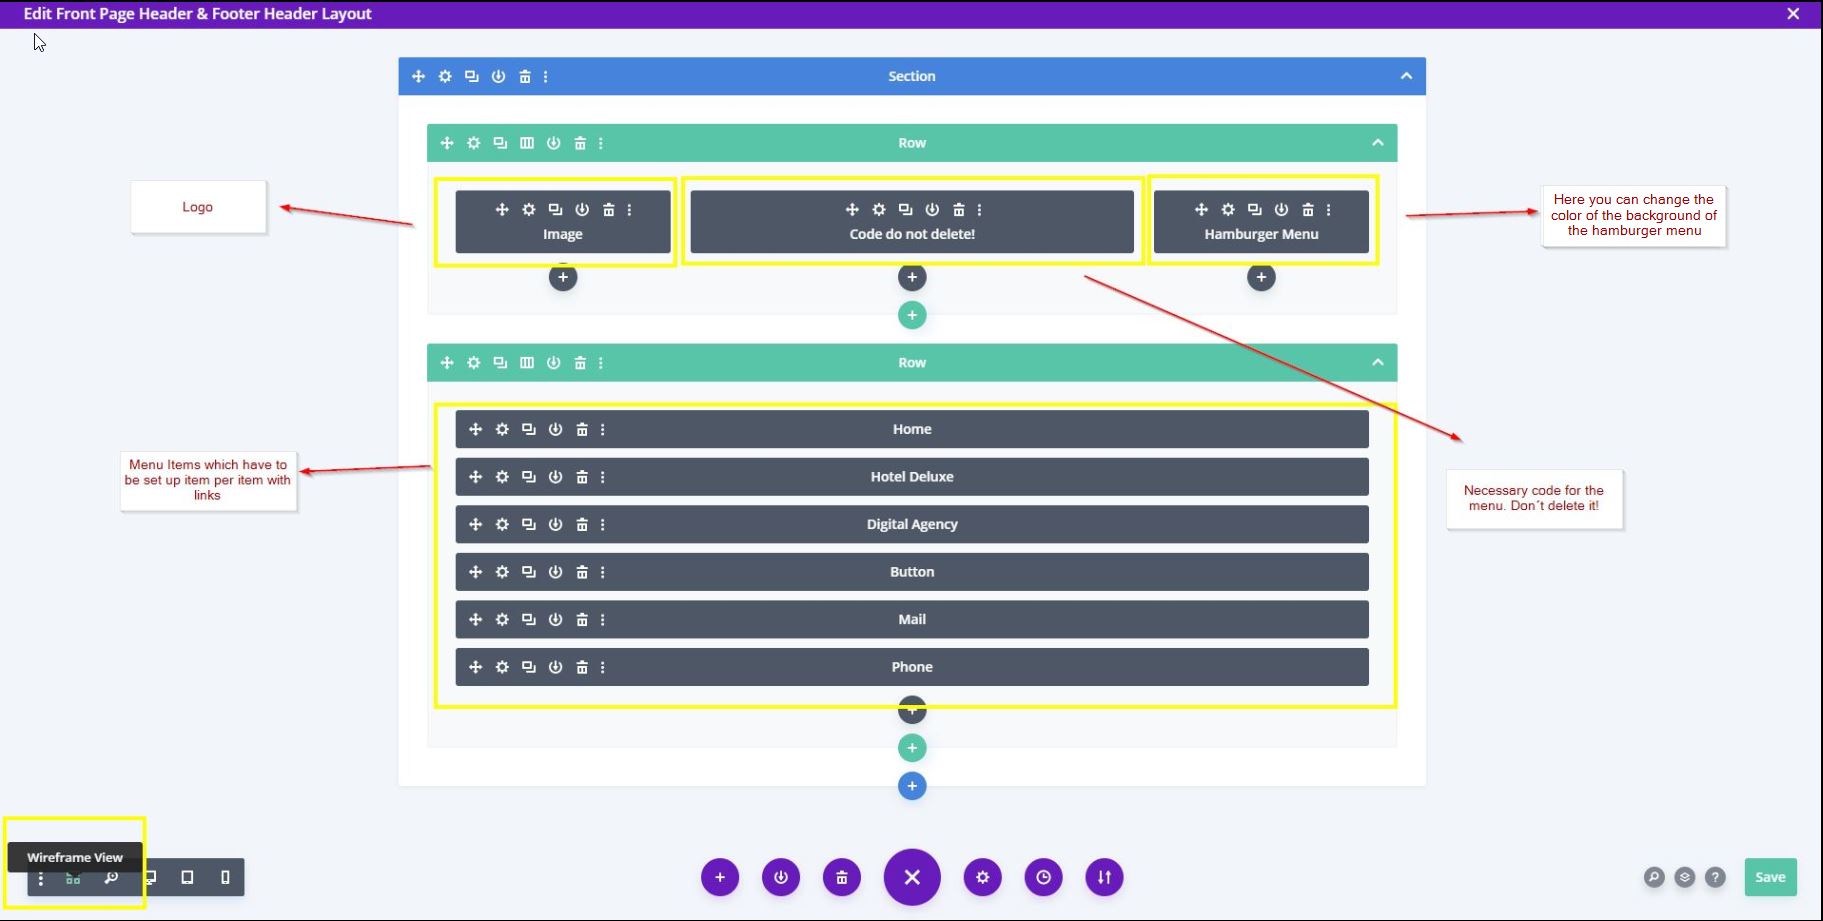
1. To start styling the header it´s recommended to switch to the Divi Wireframe View (left bottom) to have a better overview of the header.
2. In the screenshot below you see an overview. You can change logo and the menu items which are located in the second row. This menu is not connected to a menu which you can setup under Appearance > Menu. This menu is independent and you can add any kind of modules you want. So text, blurbs, contact forms, etc. In this example we use text modules and a button module. To change the background of the hamburger menu when closed click on the Hamburger Module > Content > Background and change it there. To change the background color and border color of the menu when opened click on the second row > Content > Background and change it there. Or under Design > Border and change border settings there.
Everything can be adapted and changed with the Divi Standard design options!
3. To modify the items just open a module, change text, link and link behaviour with the Divi standard design options. Also you can modify size, font, etc. with standard Divi design options.
4. If you are familiar with CSS and want to change the behavior of the menu even more like fading effect, round edges, etc. open the Code module and enter your values there. You will find the following pre-defined CSS code which you can change where you see a comment and description – only for advanced users.
7b. Header Menu Styling Options | Digital Agency Header
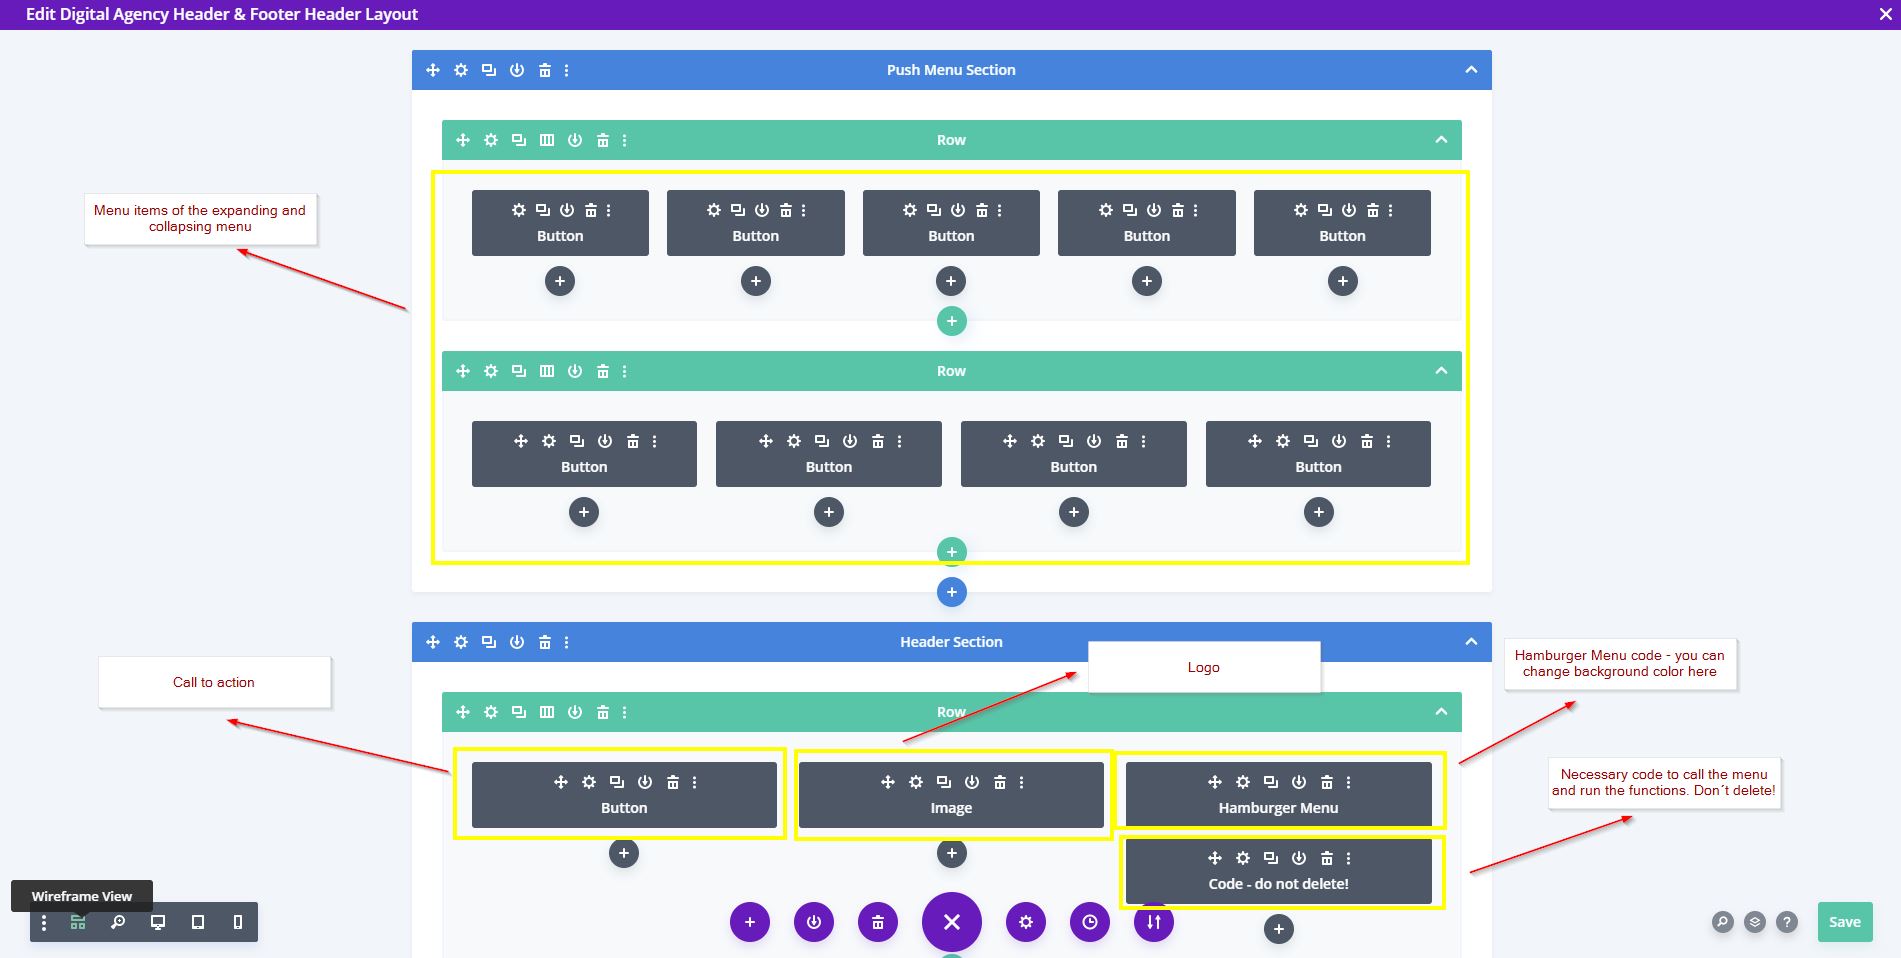
1. To start styling the header it´s recommended to switch to the Divi Wireframe View (left bottom) to have a better overview of the header.
2. The rest is similar to the Front Page Header. In the below screenshot you see an overview. First row is the opened menu where you can add and style each individual menu item. As the Front Page Header this menu is not connected to a menu which you set up under Appearance > Menu. It is independent and you can add each module you want. So text, buttons, blurbs, etc…
3. To change background of expanding menu click on the first Section > Content > Background. To change background of the hamburger menu click on the Hamburger Menu Module > Content > Background.
Also everything can be adapted and changed with the Divi Standard design options!
Just open the module and change it to your needs.
7c. Header Menu Styling Options | Divi Consulting Header
1. To start styling the header it´s recommended to switch to the Divi Wireframe View (left bottom) to have a better overview of the header.
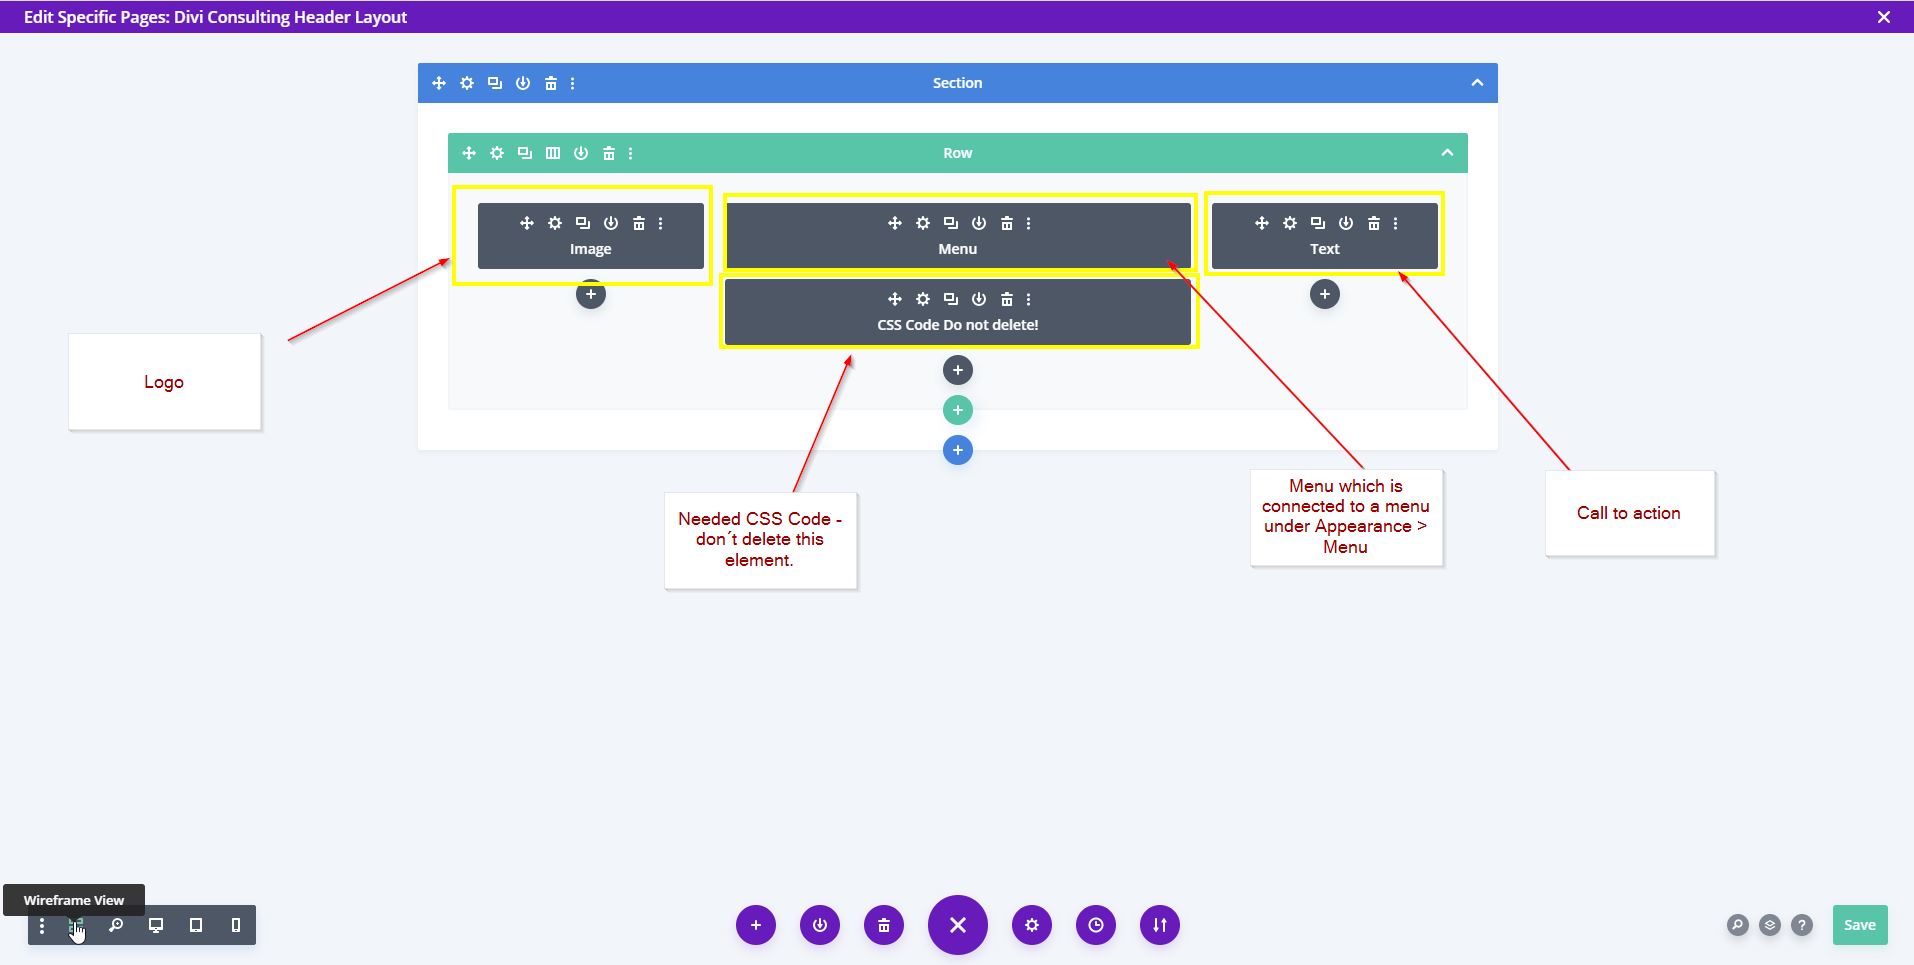
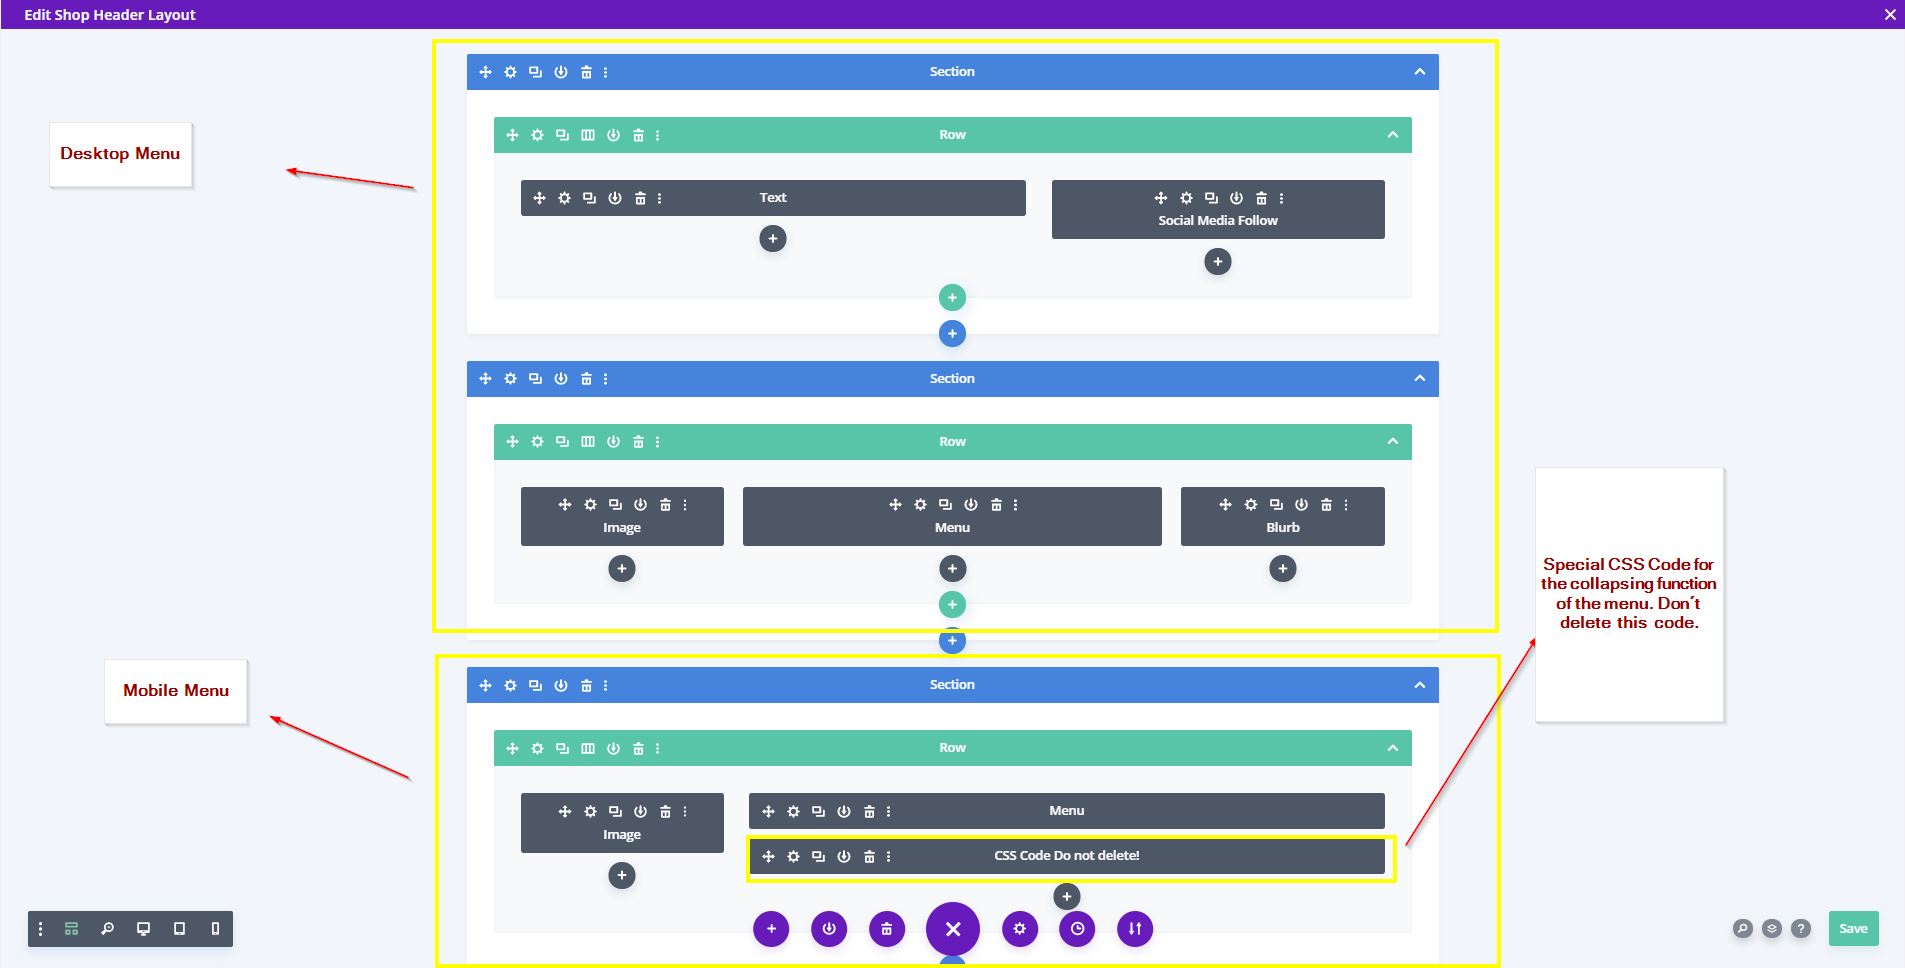
2. The rest is similar to the Front Page Header and Digital Agency Header. In the below screenshot you see an overview. The module items are self explaining. This header is connected to a menu which you can setup in Appearance > Menu. You can style everything with Divi standard options.
Just open the module and change it to your needs.
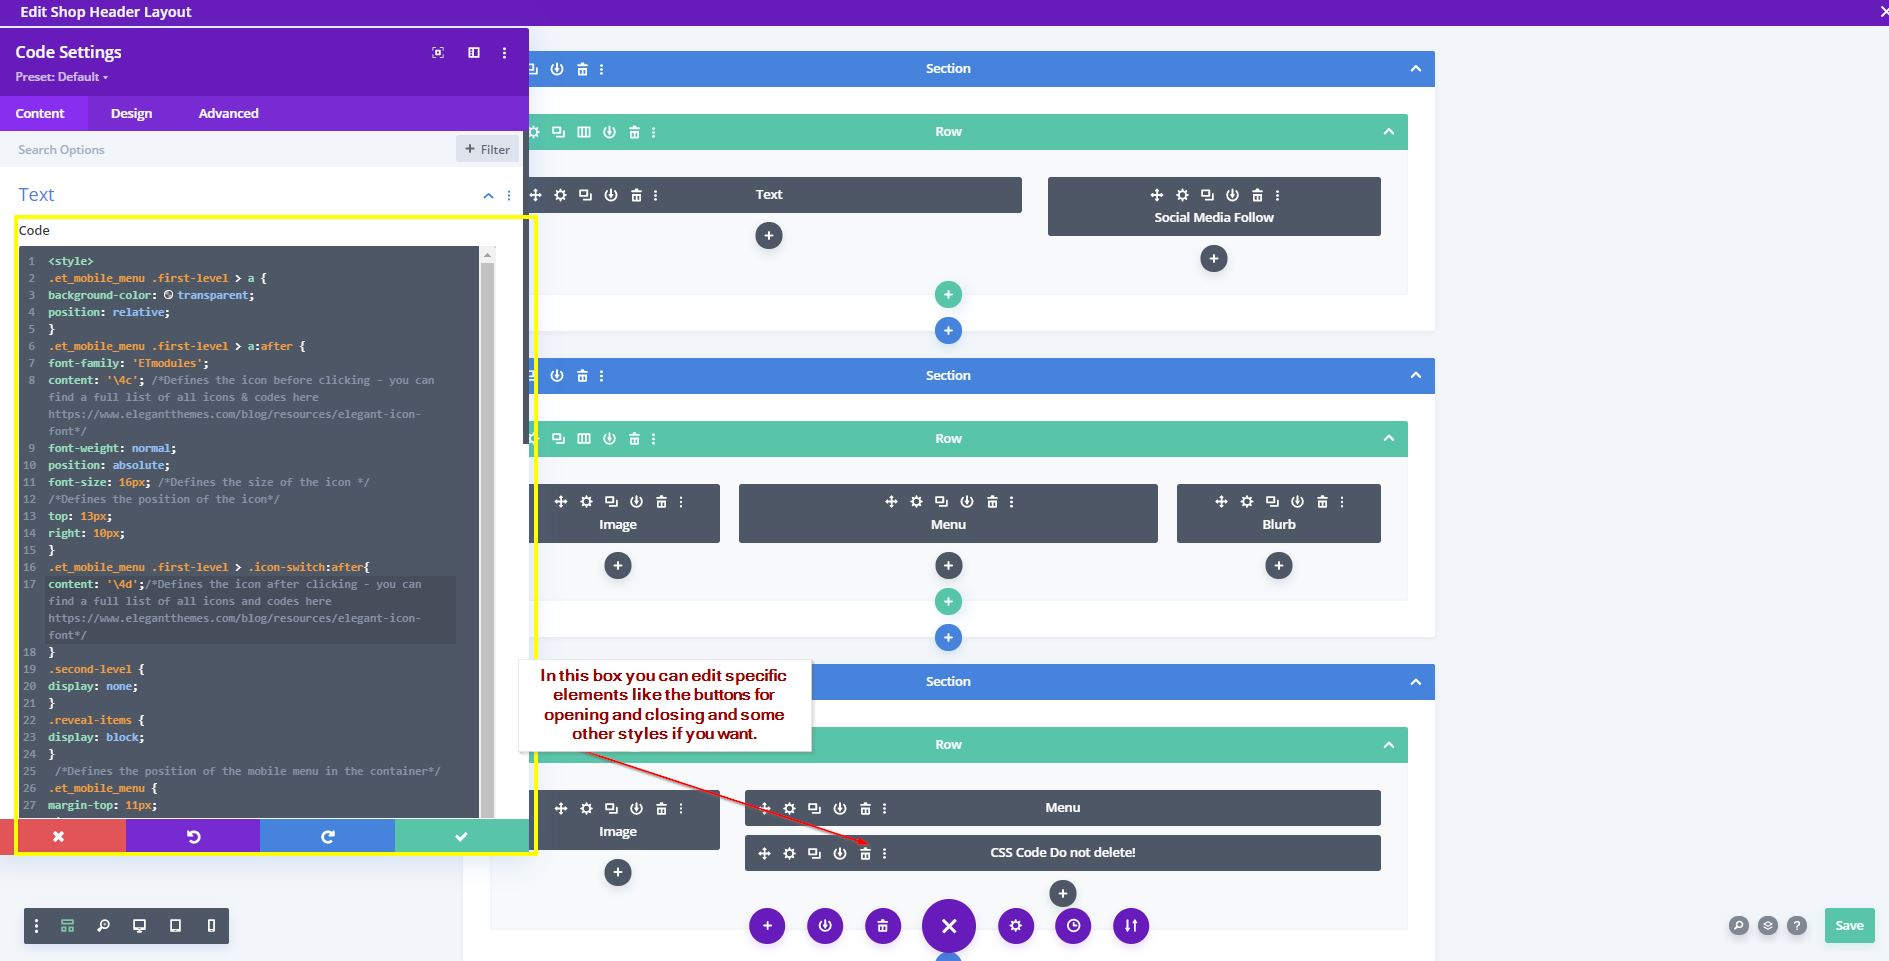
3. Similar to the Front Page Header and the Digital Agency Header there is also a Code module which may not be deleted as it calls important functions for the menu. But of course you can style it here even further if you have good knowdledge of CSS.
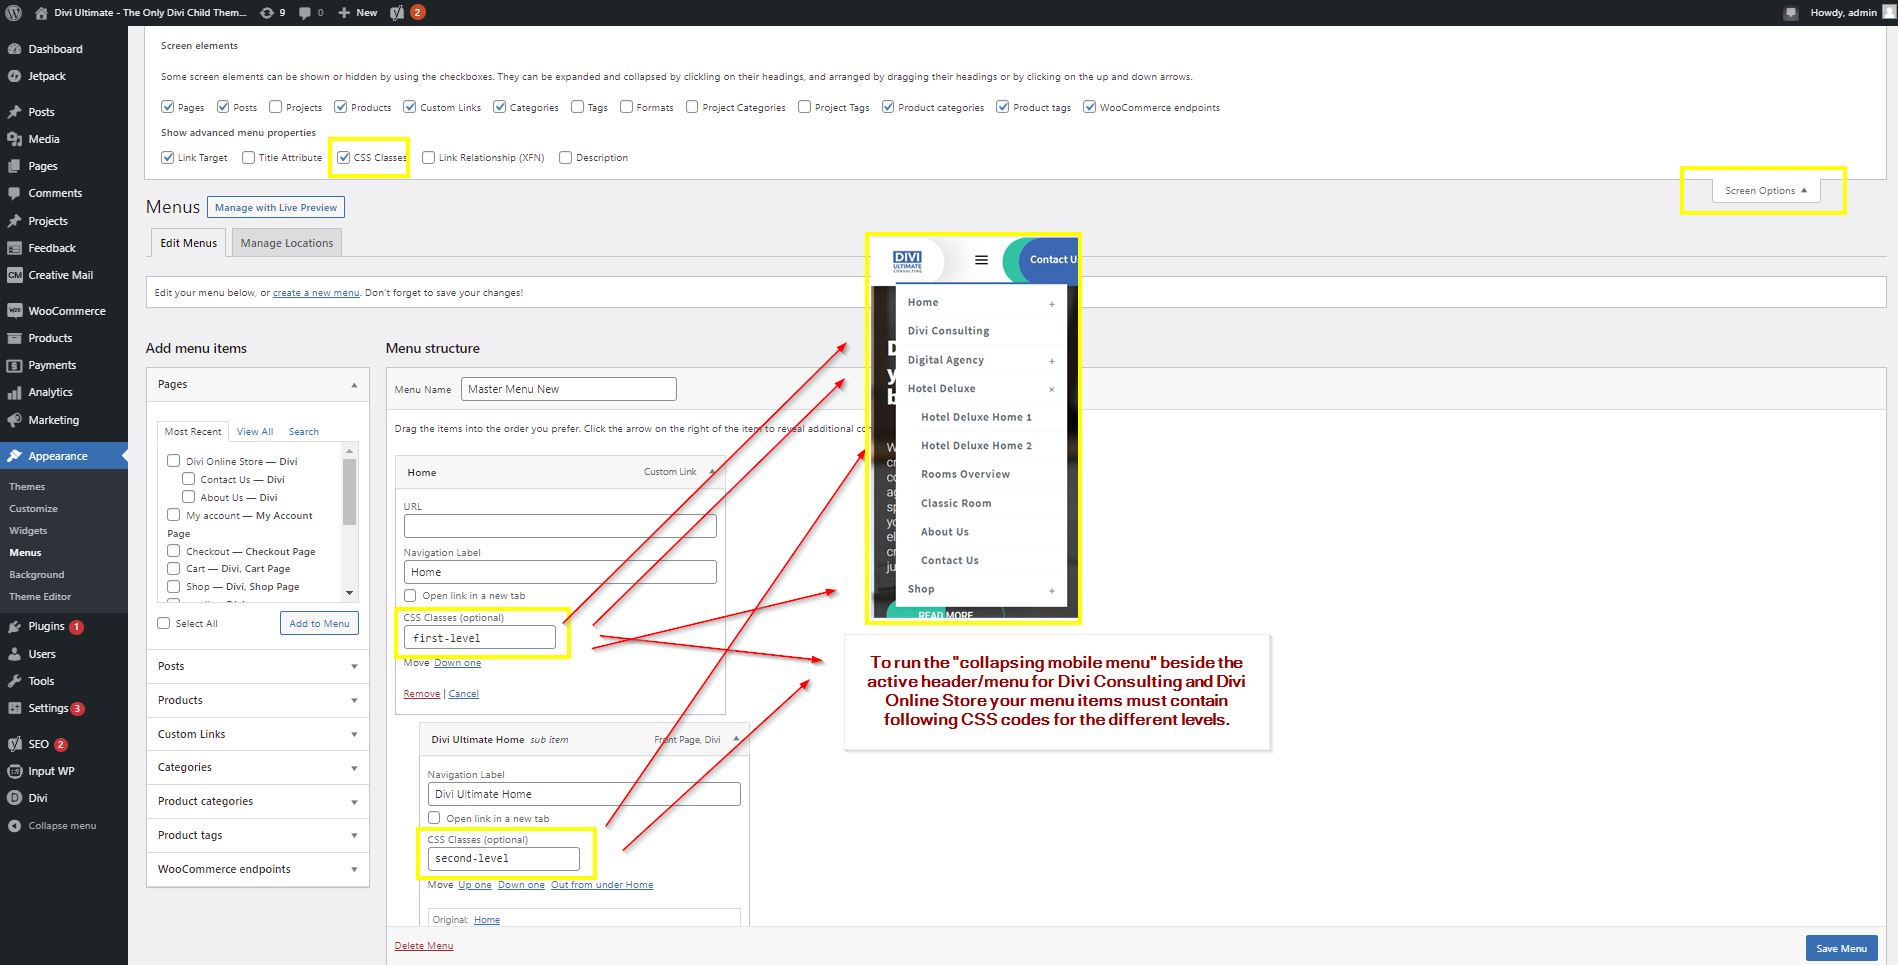
4. The mobile menu of Divi Consulting comes with a collapsing function. To run this function beside the above-mentioned documentation, it´s important to set up your menu as follows (CSS class “first-level” for the menu items on first level and “second-level” for the menu items on second level)
7d. Header Menu Styling Options | Divi Online Store
They all have different custom body items that´s why we have so many different blocks. But ALL share the SAME header and the SAME Footer. So once you have changed a custom header of one block, you need to copy & paste the header into the other block as well.
1. To start styling the header it´s recommended to switch to the Divi Wireframe View (left bottom) to have a better overview of the header.
2. The rest is similar to the Front Page Header and Digital Agency Header. In the below screenshot you see an overview. The module items are self explaining. This header is connected to a menu which you can setup in Appearance > Menu. You can style everything with Divi standard options.
Just open the module and change it to your needs.
3. Similar to the Front Page Header and the Digital Agency Header there is also a Code module which may not be deleted as it calls important functions for the menu. But of course you can style it here even further if you have good knowdledge of CSS.
4. The mobile menu of Divi Online Store comes with a collapsing function. To run this function beside the above mentioned documentation, it´s important to set up your menu as follows (CSS class “first-level” for the menu items on first level and “second-level” for the menu items on second level)
8. Stylesheet | style.css
Beside the standard Divi Styling options and the individual header & footer customization which is described above Divi Ultimate also comes with some general styles for the entire site. Those elements are situated in the style.css file which you can find under Appearance > Theme Editor > Divi Child Theme > style.css
Following elements you can style in the style.css:
- Front Header Background Color when scrolling down
- Scroll to top button color and border-radius
- Behaviour Hotel Deluxe Contact Form
- Global Slider Styles (slider_ultimate)
- WooCommerce Stylings
In this file, all codes which you can change, are explained inline and you can change the values to your needs. Advanced CSS knowledge is important to change things in this area. Also think of backuping your site before changing and kind of core codes!
9. Using the Ken Burns Effect
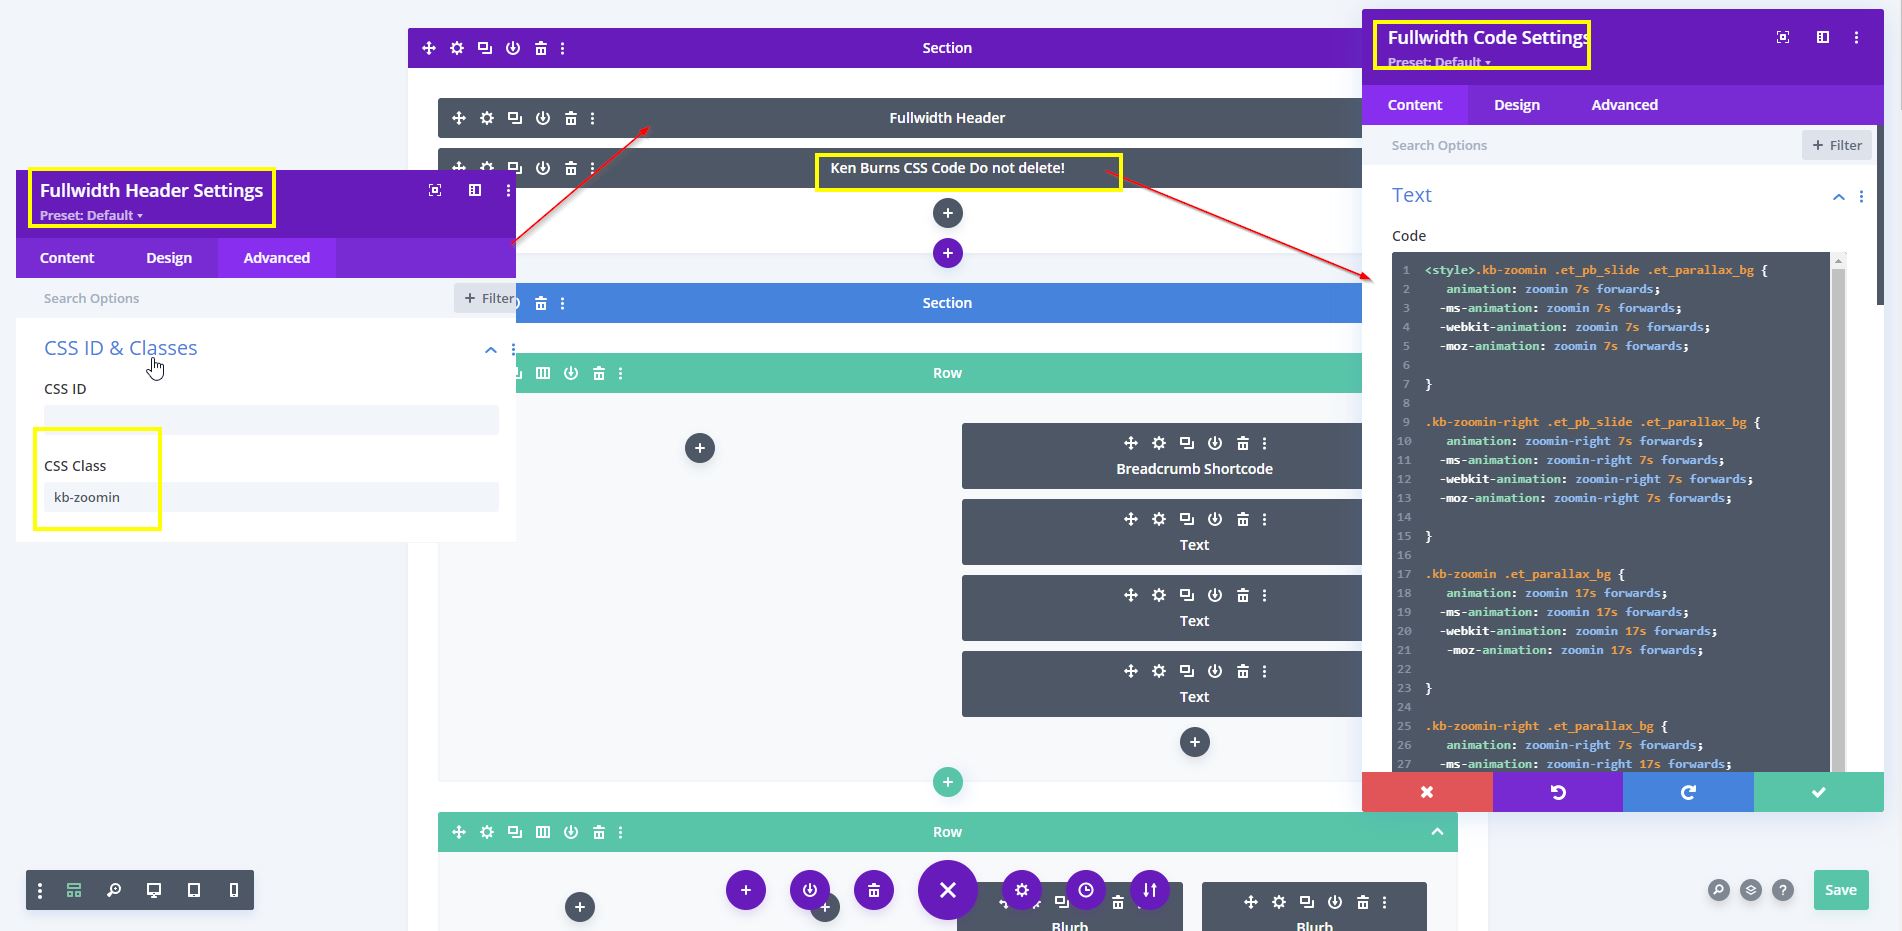
The Ken Burns Effect is a cool and great looking automatic zoom effect for images. Currently this effect is implemented in the Digital Agency Theme.
The CSS Code lies in a code module under the fullwidth header. There you can find all the codes and with css knowledge it can be adapted. Don´t delete this code. The fullwidth header itself has the css class “kb-zoomin” which pulls the effect. To duplicate this effect to other sites, just copy the Fullwidth Header + The CSS Code module and change the content. To get the effect running parallax CSS for the background image must be activated!
10. Using the Project Hover Effect
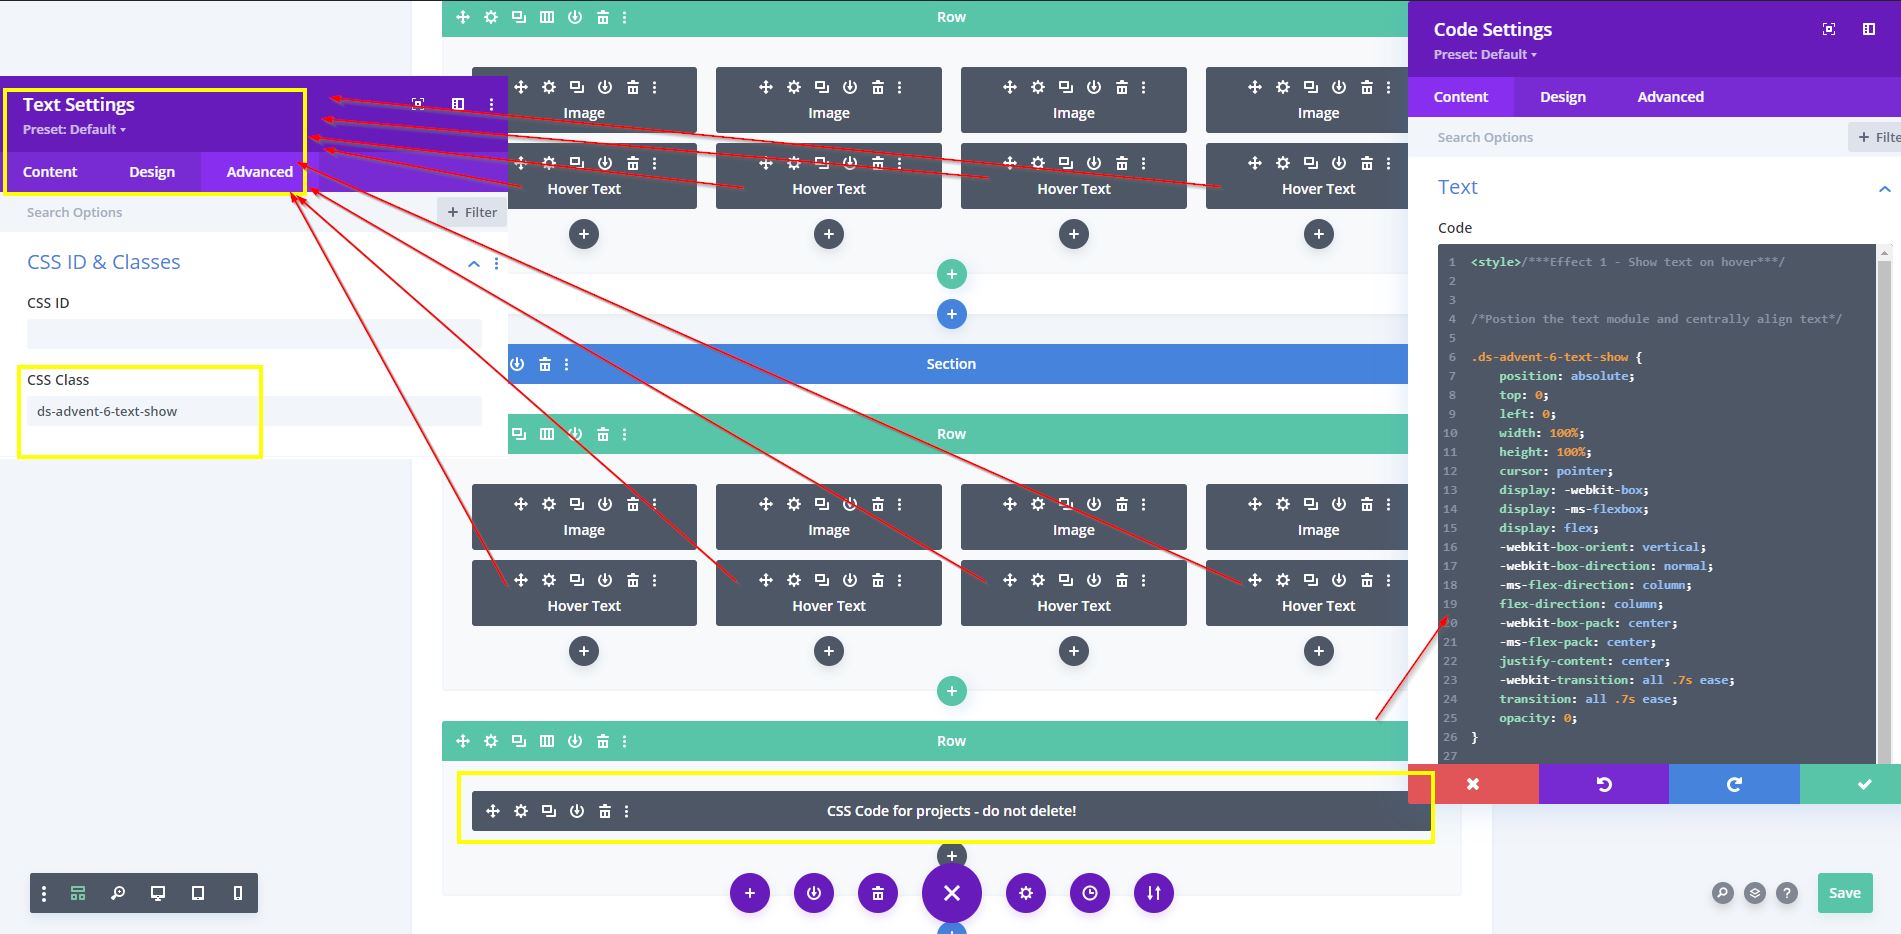
The Ken Burns Effect is a cool and great-looking hover effect. Currently this effect is implemented in the Digital Agency Theme.
The CSS Code lies in a code module under the fullwidth header. There you can find all the codes and with css knowledge it can be adapted. Don´t delete this code. The text below the images saying “Hover Text” are containing the text which appears on hovering. All hover text modules must have the css class “ds-advent-6-text-show” to get the effect. To duplicate this effect to other sites, just copy the row and the css code module and change the content.
Table of Contents
1. Theme Requirements
2. Introduction and Video Installation
4a. Setup and Usage of Breadcrumbs with SEO Yoast | mandatory for whole site
4b. How to use the new icons with WP Divi Icons | not mandatory but enhances the “usual” Divi Icons a lot
4c. Installing and Setup of WooCommerce | only mandatory for the Divi Online Store
4d. Installing and setup Date & Time Picker for Divi Contact Form | only mandatory for Divi Hotel Deluxe Home 2 if you want to use the form with date picker
8. Stylesheet | style.csss
